
01Screen layout
This is the screen after a DXF is open. There are six areas to know.
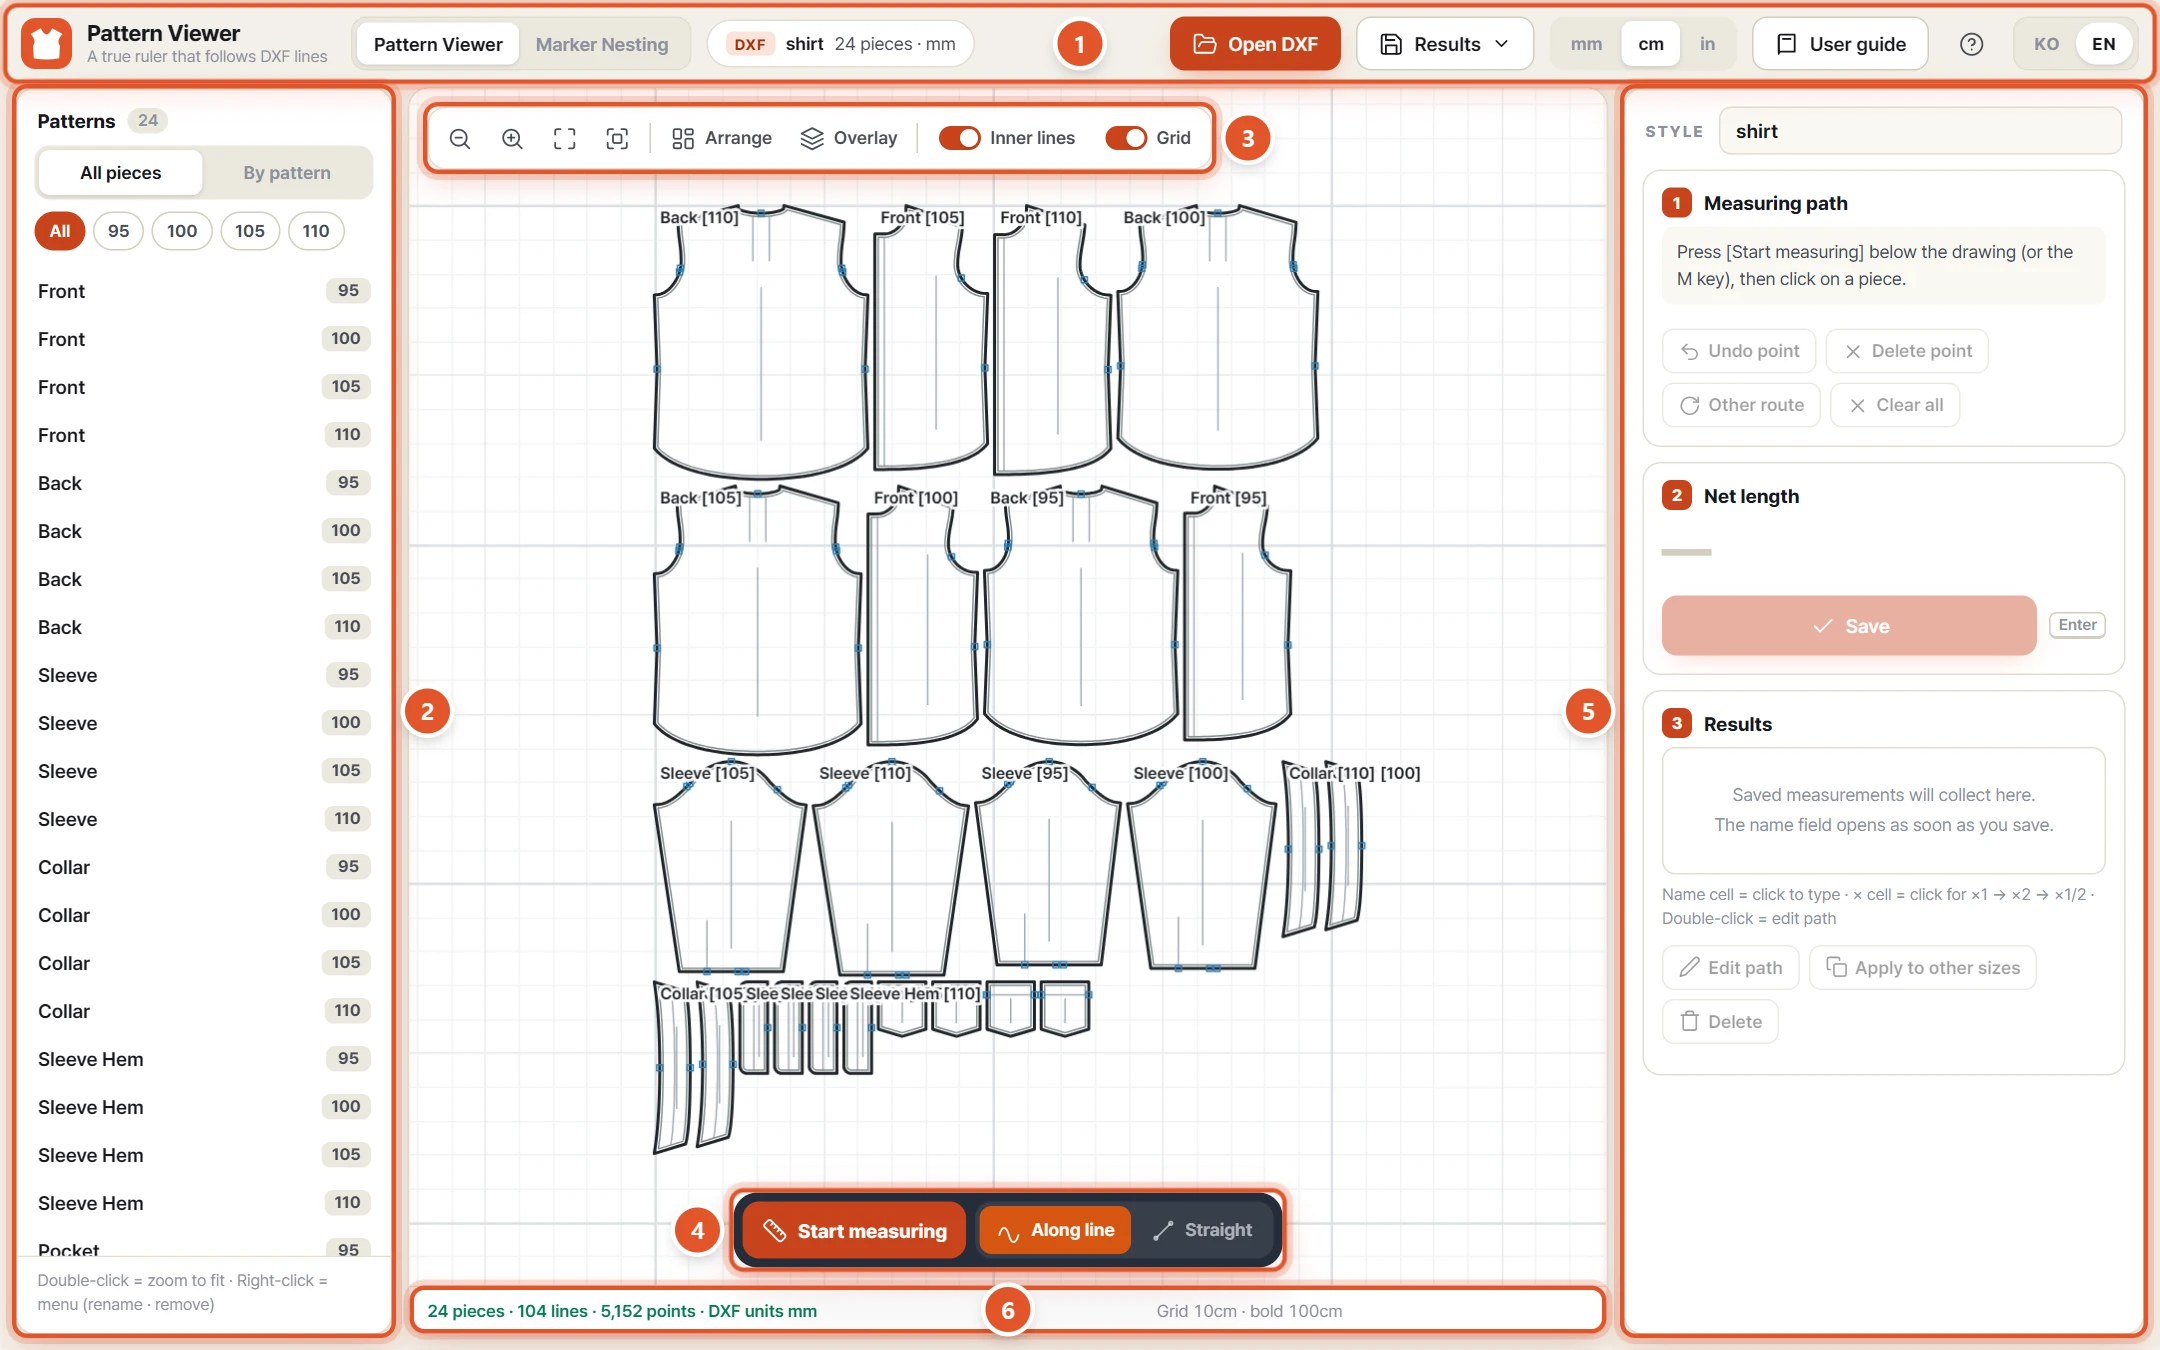
- Top bar — Open DXF, the Results menu, length units (mm · cm · in), the question-mark (help) button and the KO · EN language switch.
- Patterns — every piece and size in the open file. Pick the pieces you want to see here.
- Drawing and toolbar — the drawing is in the middle. The toolbar zooms, fits, Arranges and Overlays pieces, and turns Inner lines and the Grid on or off.
- Measuring bar — Start measuring and Along line · Straight below the drawing. While you measure it also shows Undo point, Other route and Save.
- Measure panel — read it top to bottom: ① Measuring path (your points) → ② Net length (the result) → ③ Results (saved measurements).
- Status bar — what to do next, warnings, where the cursor snapped, the grid size and the coordinates. When you are stuck, look here first.
02Open a DXF file
Load your pattern file. It is read inside your browser only and is never uploaded.
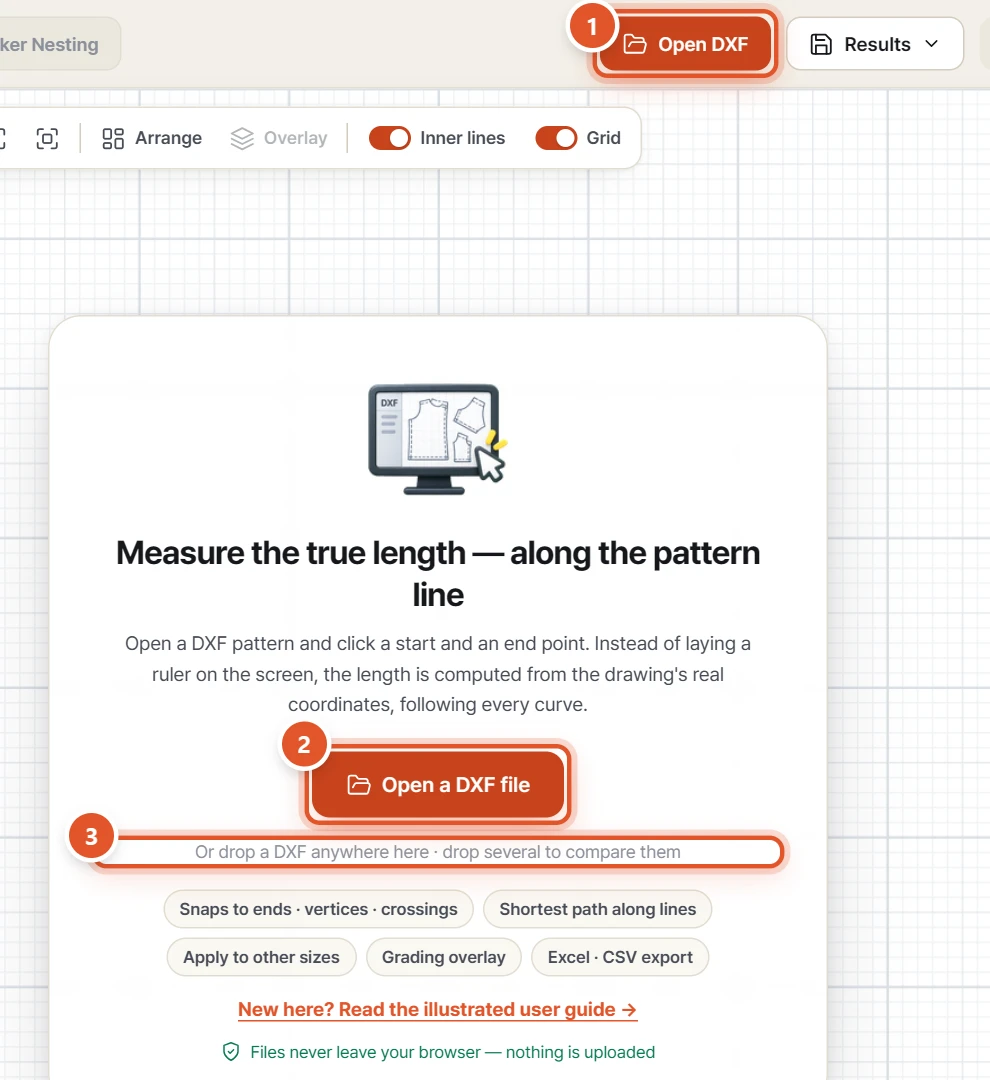
- Click Open DXF at the top right (or press Ctrl+O).
- On the start screen you can also click Open a DXF file in the middle.
- Choose a .dxf file in the file window — or simply drag the file onto the page. Drop several files to open them side by side for comparison.
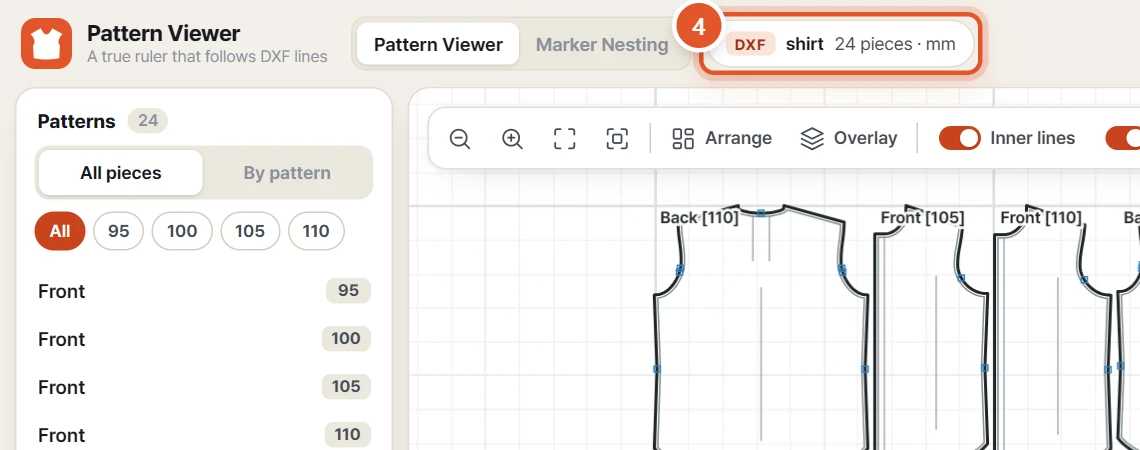
- Once it opens, the file name, piece count and units appear at the top (e.g. shirt · 24 pieces · mm) and the pieces are laid out on the drawing.
TipIf you open another file while one is open, you are asked to choose Open instead or Add to compare. With Add to compare each file gets its own colour (A · B · C).
NoteOpen instead clears the current measurements. Save them first from the Results menu.
03Patterns list — show only what you need
When a file has many pieces, use the list to narrow the drawing down to the piece and size you need.
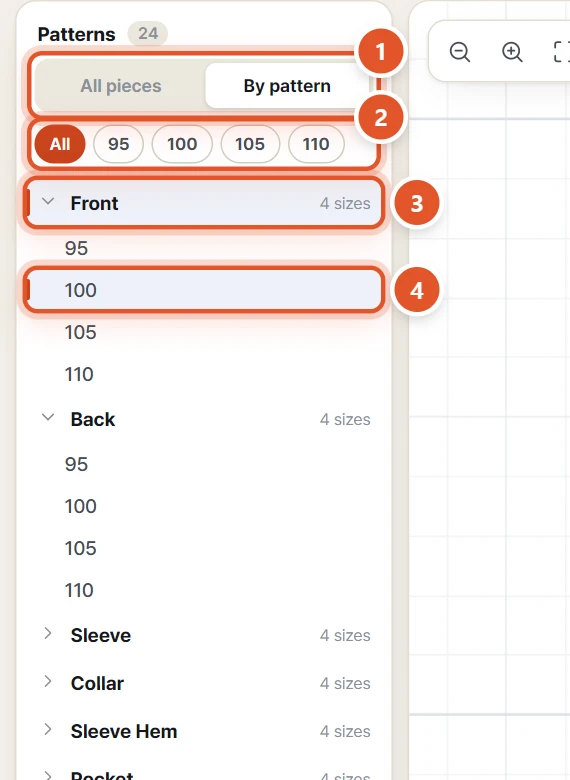
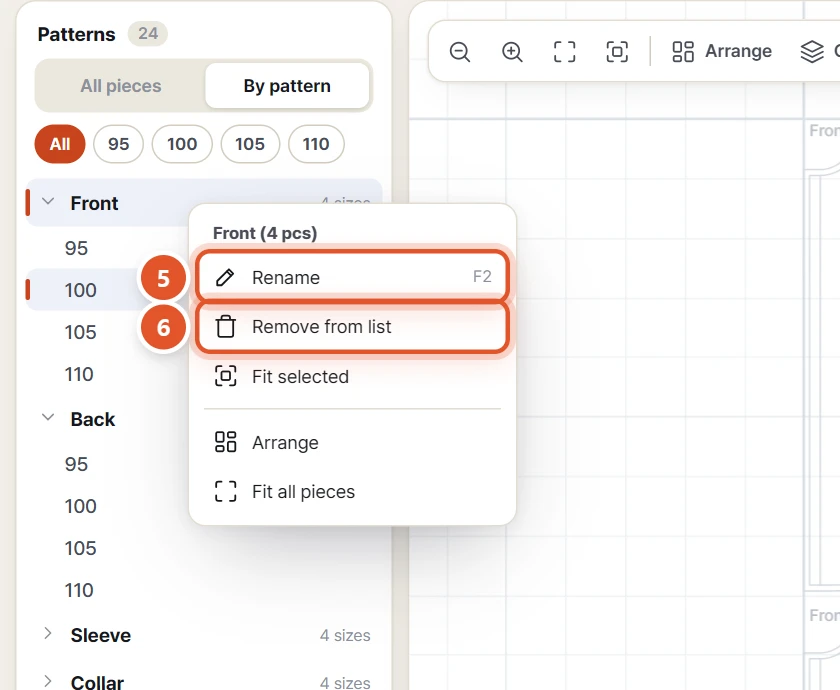
- All pieces lists every piece; By pattern groups the sizes of each pattern together.
- Click a size chip (95 · 100 · 105 · 110) to keep only that size on the drawing. All shows every size again.
- In By pattern, click a pattern name (e.g. Front) to show only its sizes. Click it again to show everything. The arrow on the left folds the group.
- Click a row to select that piece — the others fade. Double-click to zoom the drawing to it. Hold Ctrl and click to select several pieces.
- Right-click a row → Rename (F2). Type the new name and press Enter. All sizes of that pattern are renamed at once.
- Remove from list takes pieces you do not need off the list. Confirm with Remove. The DXF file itself is not changed.
TipPiece names come from the part names written inside the DXF. In English mode, common Korean part names are shown in English (앞판 → Front).
04Viewing the drawing — zoom, fit, arrange
The toolbar sits at the top left of the drawing. Hover over an icon to see its name.
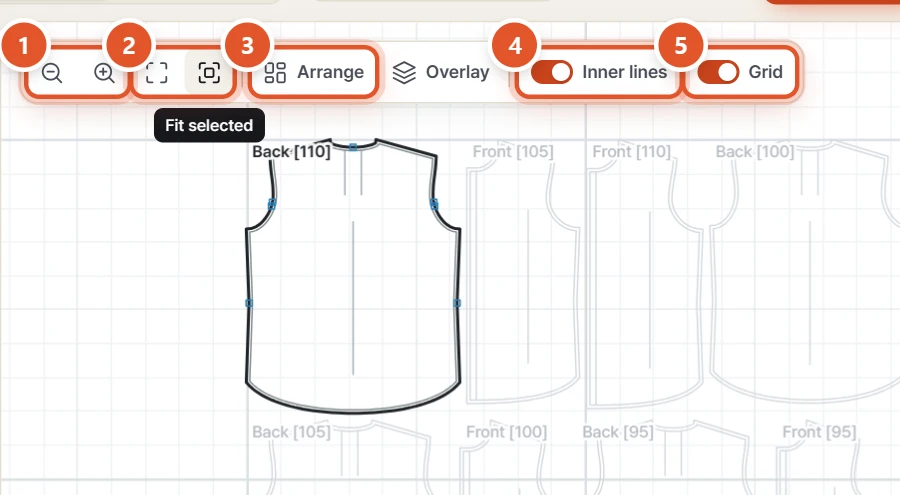
- Magnifiers: Zoom out · Zoom in (Ctrl+wheel). With the mouse, Ctrl+wheel zooms around the cursor.
- Fit all pieces fits everything visible on screen; Fit selected fills the screen with the selected piece(s).
- You can drag pieces around with the mouse — lengths do not change. Arrange packs the visible pieces neatly again.
- Turn Inner lines off to show only the cut line (thick black); sew lines, internal lines and notches are hidden.
- Grid shows the drafting grid. Its size is shown on the right of the status bar (e.g. Grid 1cm · bold 10cm).
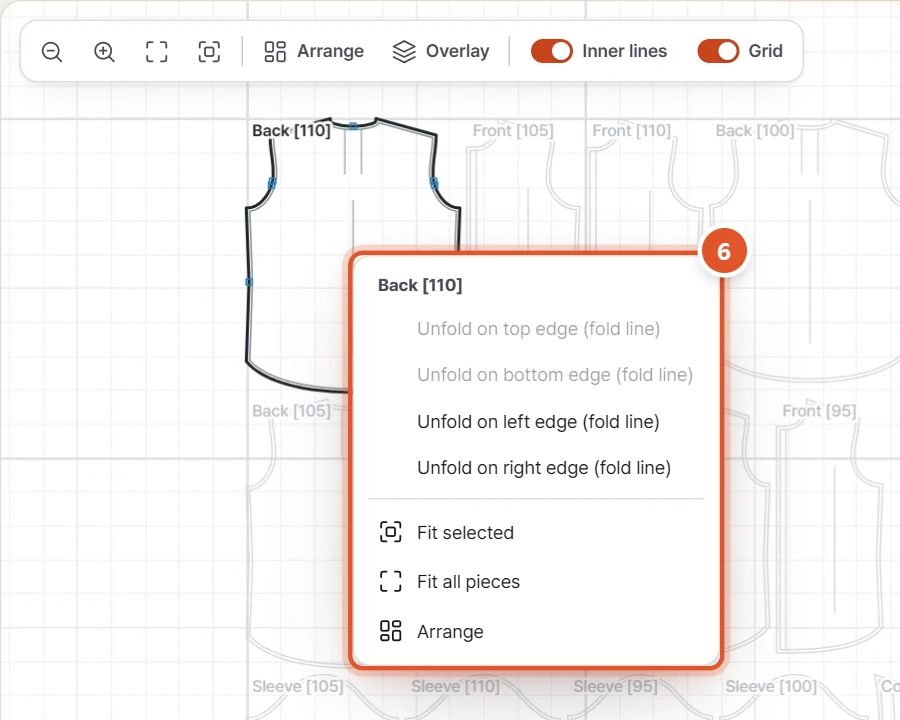
- Right-click a piece for Fit selected · Fit all pieces · Arrange. A half (fold) piece can be mirrored with items such as Unfold on left edge (fold line) — only straight edges that can be a fold line are enabled. Undo it with Turn unfold off (half piece).
TipTo pan: drag an empty area, or drag with the middle button or while holding Space. The wheel scrolls up and down, Shift+wheel left and right. Double-click a piece to zoom to it.
05Measure along a line (armhole example)
Here we measure the armhole of Front, size 100, on the sew line — from the shoulder point to the underarm. The length follows every curve.
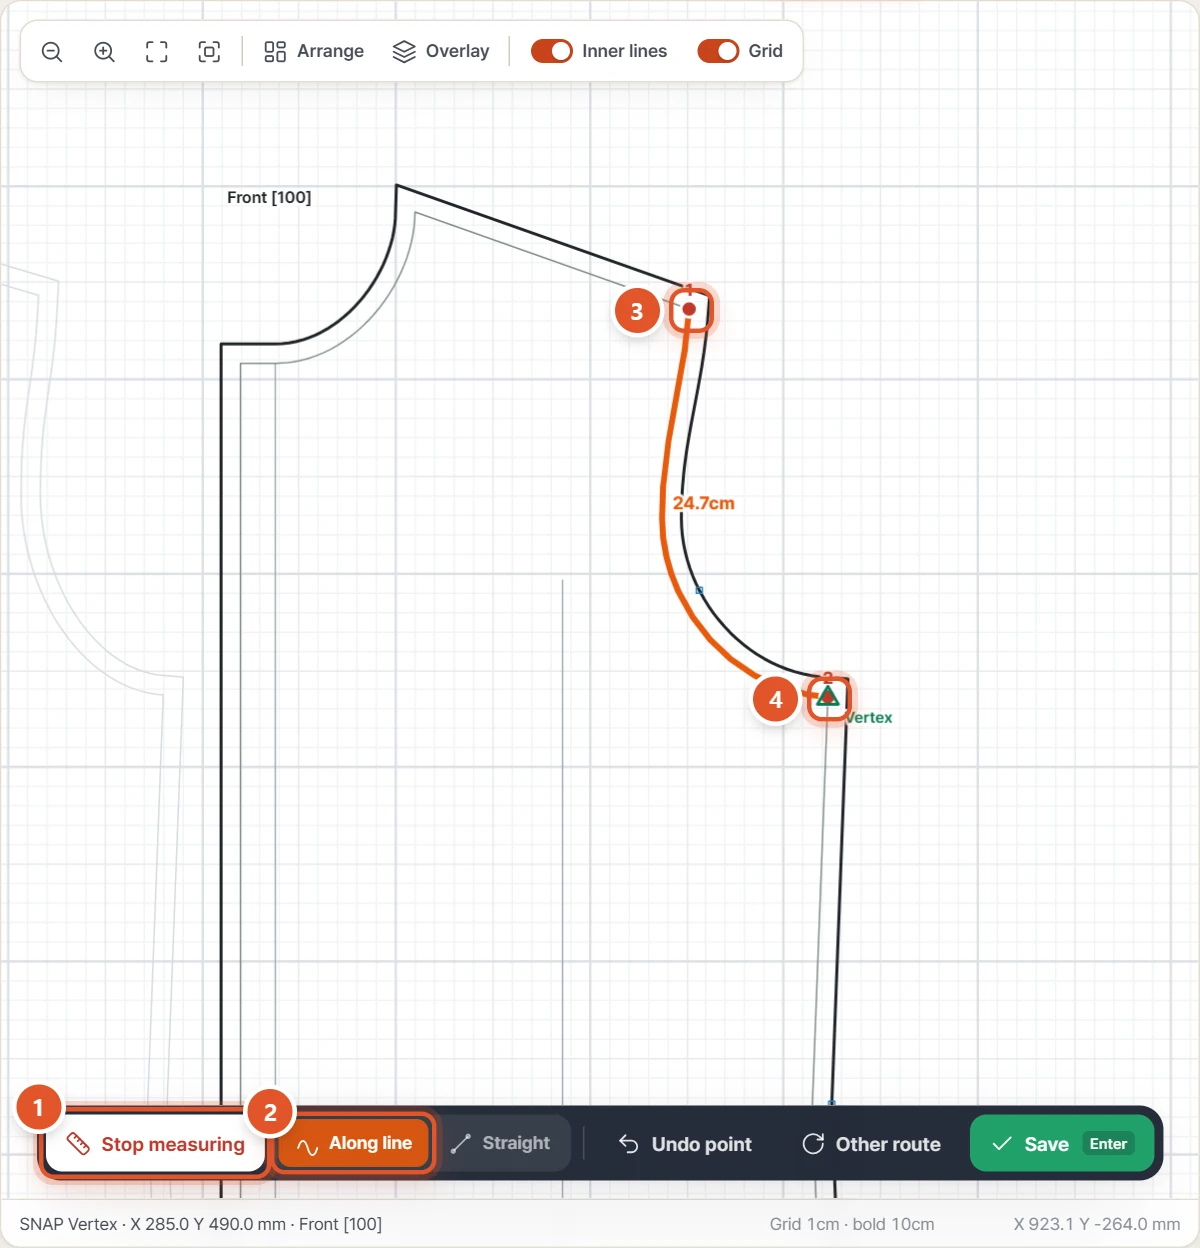
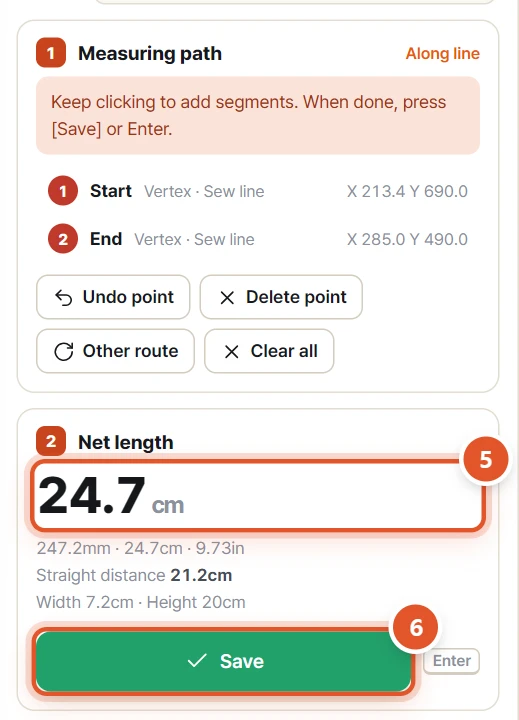
- Click Start measuring below the drawing (or press M). While measuring, the button reads Stop measuring.
- Check that Along line is on (it is by default).
- Click the start point (shoulder point). Near a line the cursor snaps with a green marker: Endpoint (□), Vertex (△), Intersection (×) or On line (○). The thin grey line is the sew line; the thick black line is the cut line.
- Click the end point (underarm). The path between the points follows the pattern line in orange, with its length written beside it.
- The result appears large under Net length, with the mm · cm · inch values, the straight distance and the width/height difference below it.
- Click Save or press Enter. A new row appears under Results with the name field already open. Type a name (e.g. Front armhole) and press Enter.
TipLengths are always computed from the DXF's real coordinates — zoom level or where you dragged the piece make no difference. Click extra points between start and end to pass through them (via points).
NoteOne measurement stays inside one piece. To measure another piece, save first or press Esc to stop.
06Fixing points and the path
Use these when a point is wrong or the path goes the wrong way. The picture shows three points — neck point → shoulder point → underarm — so the middle one is Via 1.
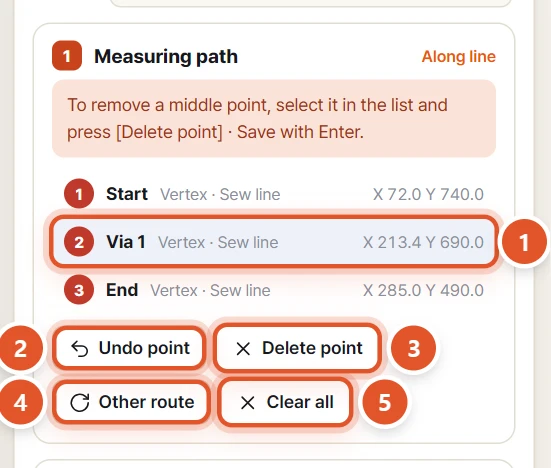
- Click a row in the Measuring path list to select that point (its red dot on the drawing turns darker).
- Undo point removes the last point you clicked (Ctrl+Z).
- Delete point removes the selected point — or the last one if nothing is selected.
- Other route switches the last segment to the other way round the piece. Each click tries the next possible route (Along line only).
- Clear all (Esc) removes every point and stops measuring.
TipIf the path is much longer than the straight distance, the status bar warns you. Press Other route or click one more via point on the route you want. Undo point and Other route are also on the measuring bar below the drawing.
07Measure a straight distance (chest width 1 cm below the underarm)
Here we measure the chest width of Back, size 100, 1 cm below the underarm. If you do not need to offset a point, skip steps 3–5 and just click two points.
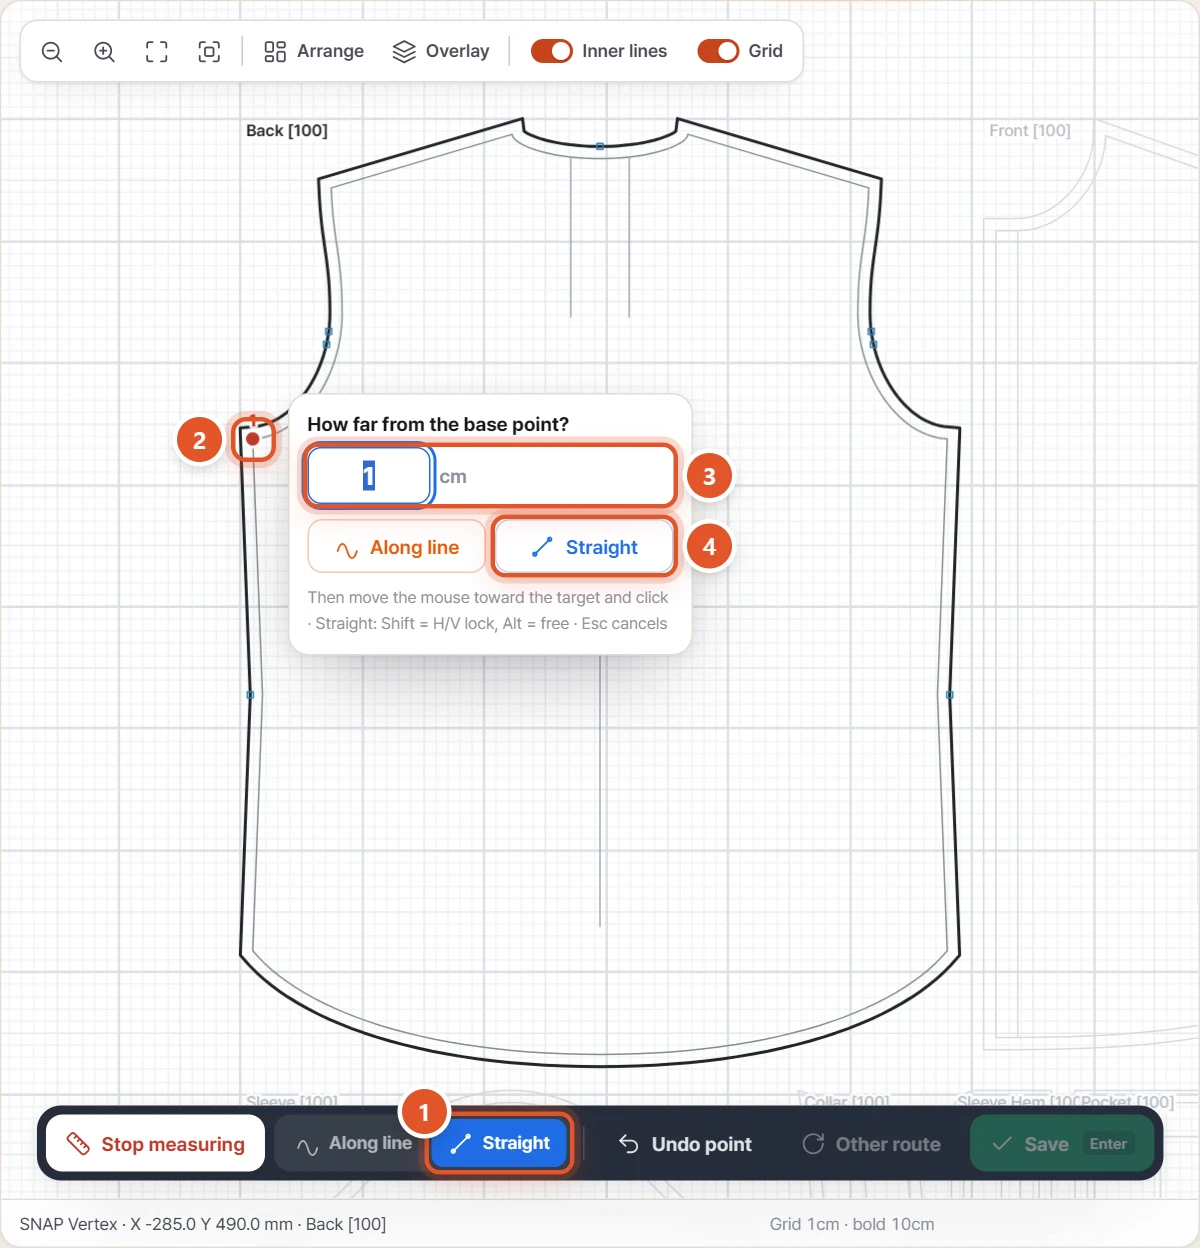
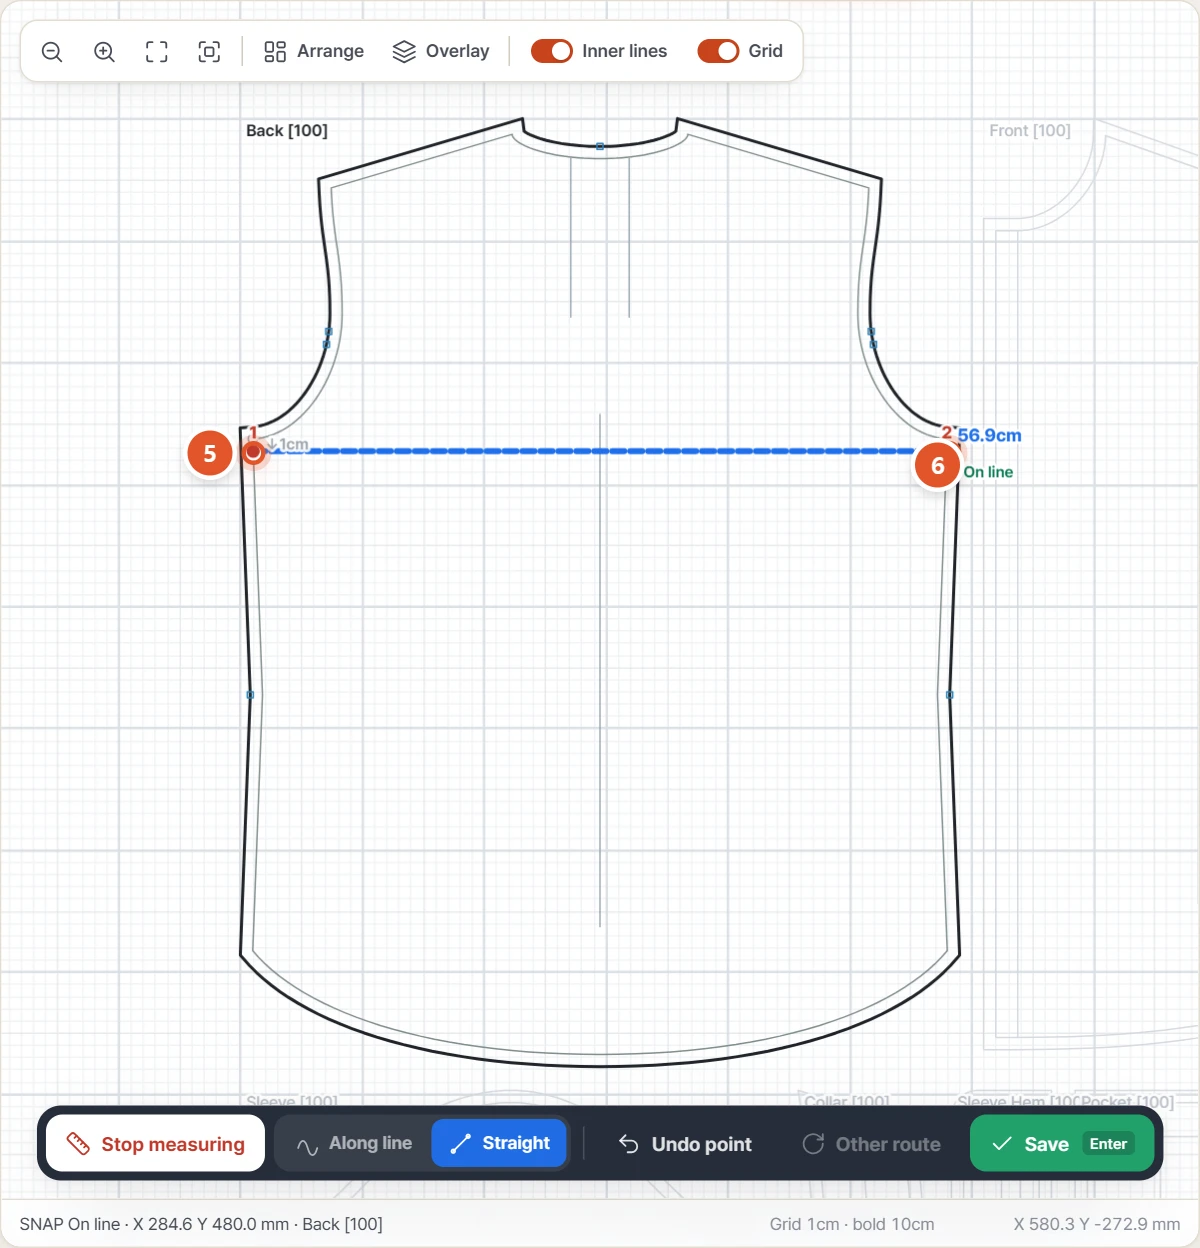
- Click Start measuring, then Straight below the drawing (or press L while measuring).
- Click the first point (left underarm).
- Right-click → Offset from this point…. In the small How far from the base point? window, enter 1 (in the current length unit — cm here).
- Click Straight. Along line would move the point that distance along the pattern line instead.
- Move the mouse in the direction you want (down) and click. The point moves 1 cm down onto the side seam, linked to the base point by a dotted line.
- Click the other side seam at the same height (hold Shift to lock it horizontal). When the blue dashed line and its length appear, click Save or press Enter and type a name (e.g. Chest width).
TipHold Shift while moving to lock horizontal/vertical from the previous point (Straight only). Hold Alt and click to place a point exactly where you click, without snapping.
08Managing results — name, multiplier, edit, delete
Saved measurements collect in the Results table on the right. Click a row and its path is highlighted in purple on the drawing.
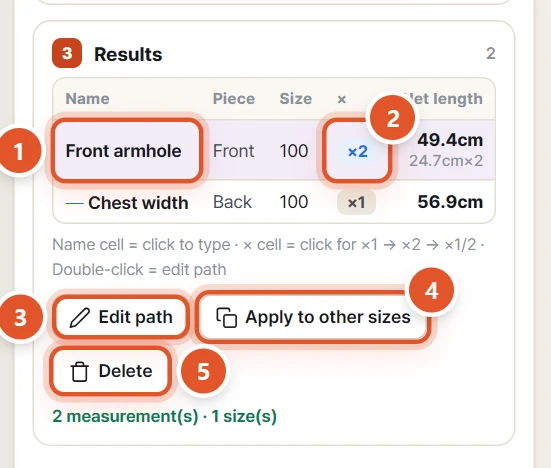
- Name cell: click the name of the selected row again (or double-click it) to edit the name. Press Enter to finish.
- × cell (multiplier): each click cycles ×1 → ×2 → ×1/2. Use ×2 when you need both left and right pieces together. The measured length is shown in small print (e.g. 24.7cm×2).
- Edit path (or double-click the row): the points come back on the drawing. Add points or remove them with Undo point, then press Enter.
- Apply to other sizes: copies the same path to the other sizes (next section).
- Delete (Delete): confirm with Delete in the window. Deleted by mistake? Press Ctrl+Z.
TipMeasurements taken in Straight mode have a ─ mark before the name. The line under the table shows how many measurements and sizes there are.
09Apply to all other sizes at once
Copy a path you measured on one size to the other sizes of the same pattern and recalculate. Handy for checking grading.
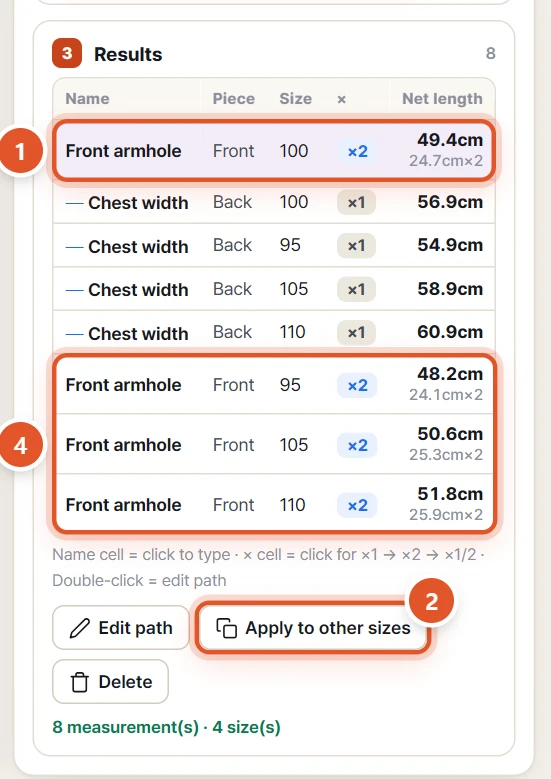
- Click the row you want to copy in the Results table.
- Click Apply to other sizes.
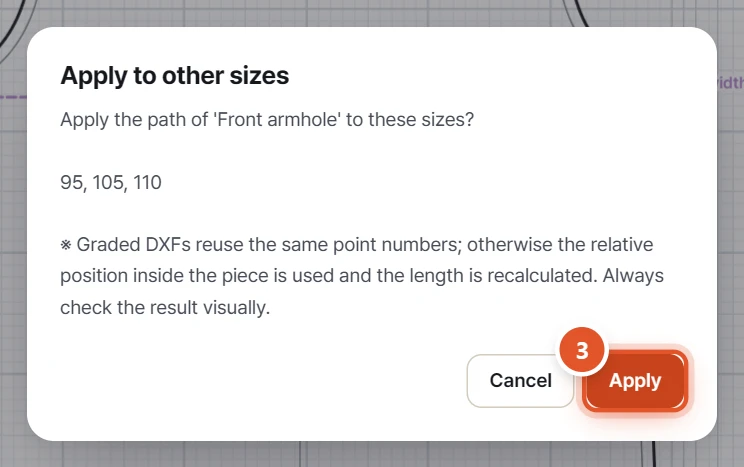
- The window lists the target sizes (e.g. 95, 105, 110). Click Apply.
- A new row is added for each size, with the same name and multiplier, so you can compare lengths size by size.
NoteGraded DXFs reuse the same point numbers; otherwise the relative position inside the piece is used. Always check the result on the drawing — click the size chip All to see the measurement lines on every size.
10Compare sizes by overlaying them
Stack the sizes of a pattern aligned at the underarm (or crotch) height and the centre, so grading differences are visible at a glance.
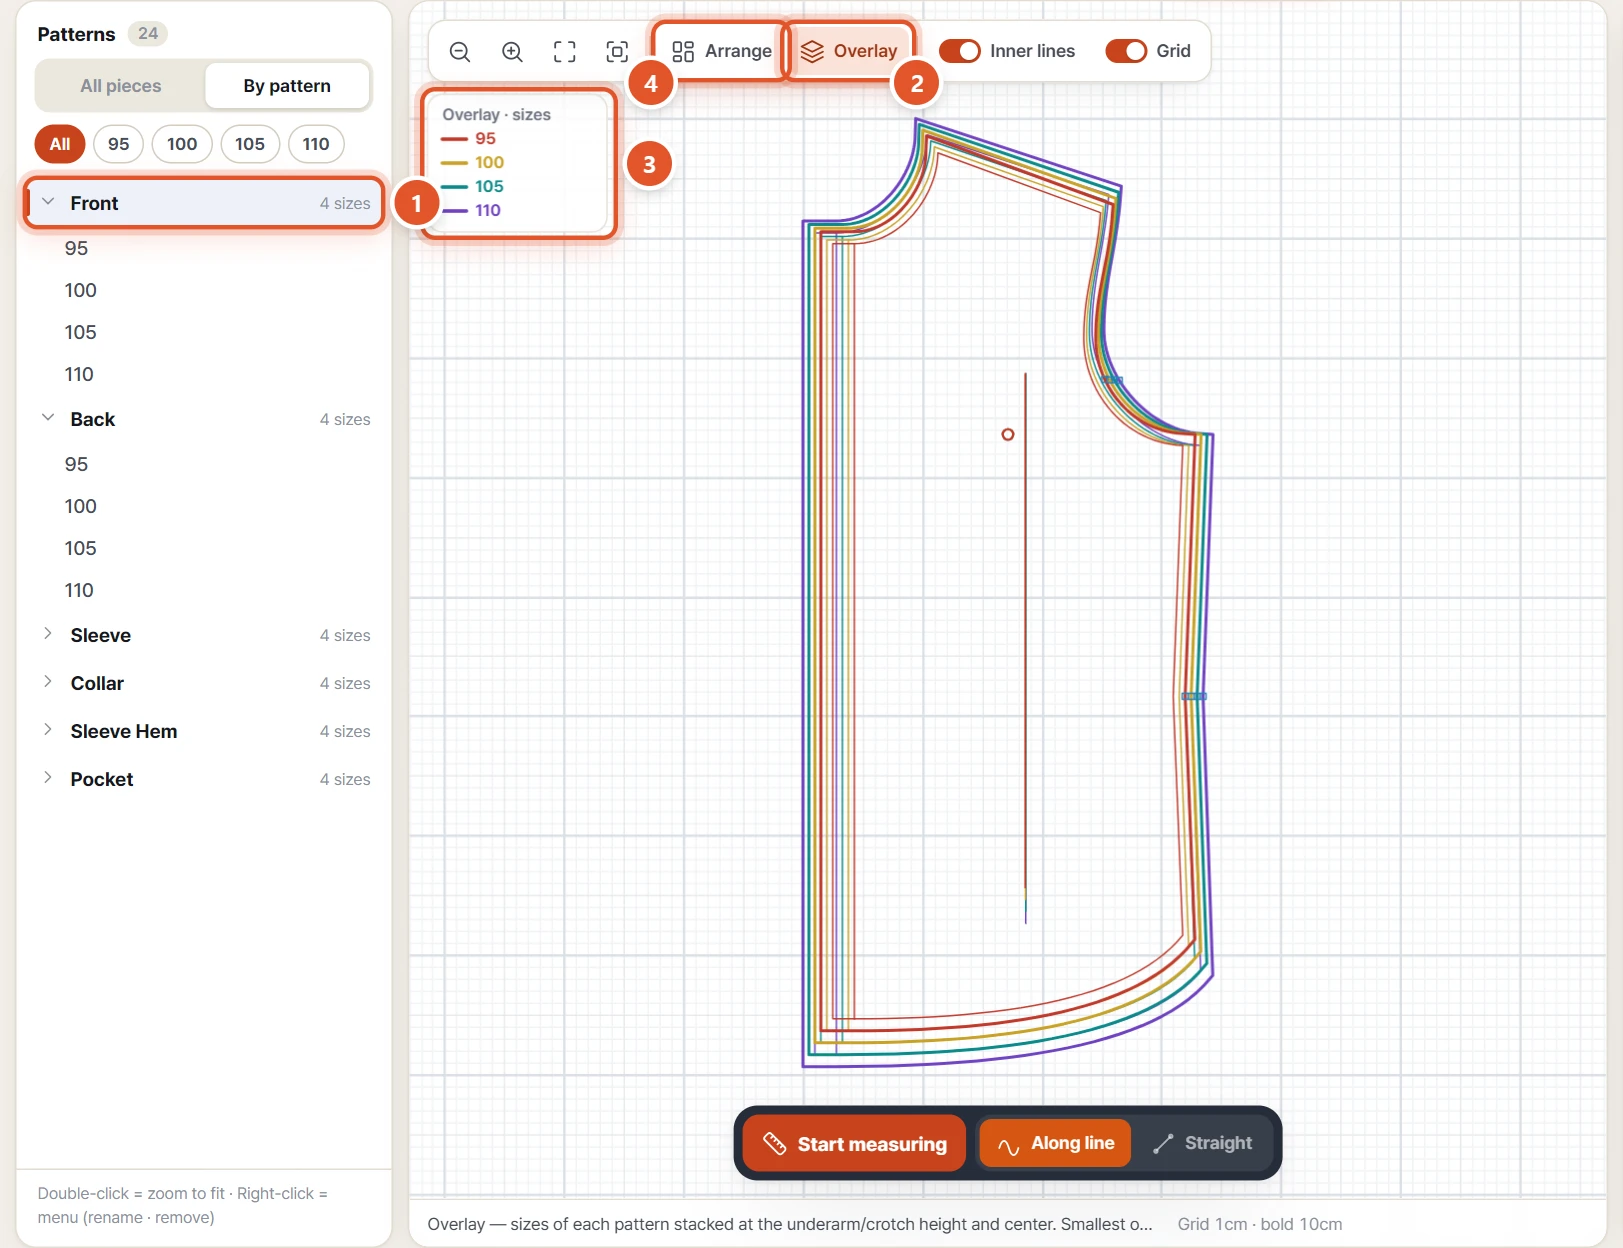
- (Optional) In By pattern, click a pattern name (e.g. Front) to overlay just that pattern. Otherwise every pattern gets its own stack.
- Click Overlay in the toolbar.
- Each size gets its own colour, listed in the Overlay · sizes legend at the top left. The smallest size is on top; the small circle marks the alignment point.
- Click Arrange to spread the pieces out again.
TipWith two files opened via Add to compare, pieces with the same name are stacked. Each further click on Overlay switches between ① same size only and ② all sizes in one stack.
11Save and export
Use the Results menu at the top to keep your measurements as files. File names start with the style number in the STYLE box on the right (e.g. shirt_pattern-length.xlsx).
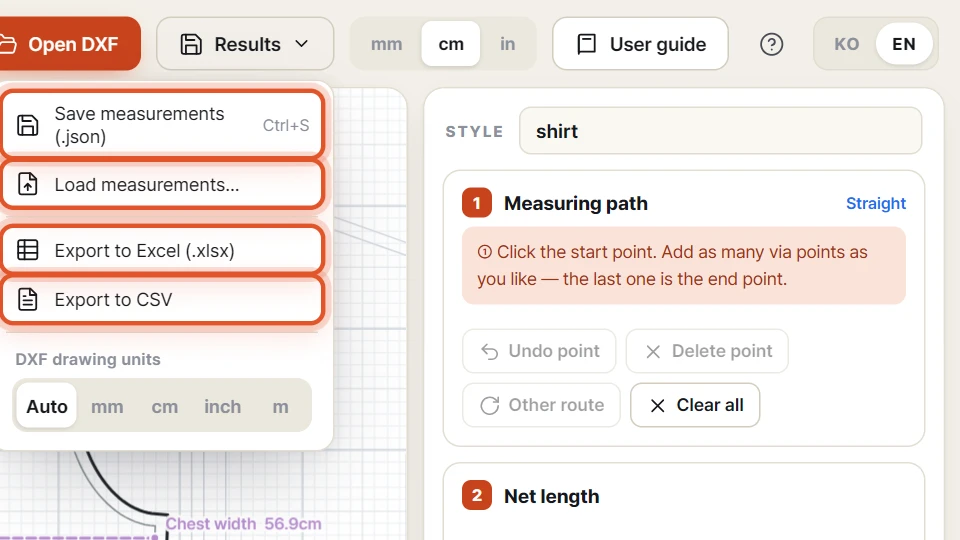
- Save measurements (.json) (Ctrl+S) — saves the whole list so you can continue later. The file also opens in the desktop app.
- Load measurements… — reopens a saved .json. Open the DXF it was measured on first, then load it. You can also drag the .json onto the page.
- Export to Excel (.xlsx) — two sheets: "Measurements" (style · file · size · name · piece · method · length · multiplier · final length in cm/mm/inch · segments) and "Size comparison" (a size-by-size table).
- Export to CSV — the same content as CSV, with the size comparison table at the bottom.
TipOnly the net length is reported — add loss and allowance when you order.
NoteMeasurements are not kept by the browser. Save them with Save measurements (.json) before you close or reload the page.
12Units, language and help
Settings on the right of the top bar.
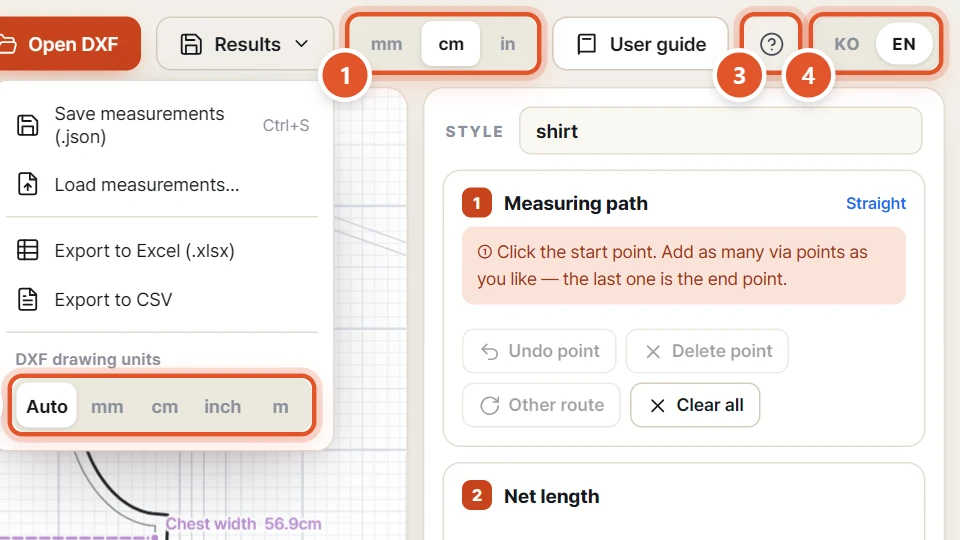
- Length unit mm · cm · in — the unit used on screen (cm at first). The table and the drawing labels change right away.
- DXF drawing units (inside the Results menu) — the unit of the DXF file itself. Normally Auto. If lengths look wrong (e.g. 10× too big), pick the right unit. If you already have measurements, confirm with Change.
- Question-mark button (F1) — the How to use window lists features and shortcuts.
- KO · EN — switches the screen language. Your browser remembers the choice.
NoteChanging DXF drawing units re-reads the drawing. Lengths already saved keep their old values, so measure them again.
13Keyboard shortcuts
| M | Start / stop measuring |
| L | While measuring: Along line ↔ Straight |
| Enter | Save the measurement |
| Esc | Cancel measuring · close the right-click menu |
| Ctrl + Z | Undo the last point (when not measuring: undo list or piece-position changes) |
| Ctrl + S | Save measurements (.json) |
| Ctrl + O | Open a DXF |
| Ctrl + A | Select all visible pieces (press again to clear) |
| Delete | Delete the selected measurement (when not measuring) |
| F1 | Show help |
| F2 | Rename the piece selected in the list |
| Shift | Straight mode: hold while moving to lock horizontal/vertical · with the wheel: scroll sideways |
| Alt | Hold and click to place a point without snapping |
| Ctrl | Hold and click pieces to select several · hold with the wheel to zoom |
| Space | Hold and drag to pan |
14FAQ
- The lengths are 10× (or 1/10) off.
- It is a unit problem. Check "DXF units …" in the status bar, then choose the right unit under Results → DXF drawing units. A DXF without unit information is read as mm.
- Is my pattern file uploaded anywhere?
- No. The file is read and measured inside your browser only. It is never sent to a server.
- Which DXF files can I open?
- It opens .dxf files (and measurement .json files saved by this tool). LINE, ARC, CIRCLE, ELLIPSE, POLYLINE, LWPOLYLINE and SPLINE entities are read, and each BLOCK becomes a piece. Names and sizes come from the text inside the piece. Without BLOCKs, nearby lines are grouped and numbered like Piece 1.
- Korean piece names are broken and shown as numbers.
- The CAD export damaged the Korean text. Check the text encoding (Korean / CP949) in your export options. You can also name the pieces yourself: right-click in the list → Rename.
- Clicking does not place a point.
- Make sure you pressed Start measuring. Points are not placed too far from a line — click closer or zoom in. One measurement stays inside one piece, so press Esc before starting on another piece. To place a point off the lines, use Alt+click.
- The path goes the wrong way round.
- Points are joined by the shortest route along the lines. Press Other route, or click an extra via point on the route you want.
- Does the value include seam allowance or ease?
- No. It is exactly the length of the line you clicked (net length) — the sew line gives the sew-line length, the cut line the cut-line length. Add loss and allowance when you order.
- How do I measure the full length of a half (fold) piece?
- Right-click the piece and unfold it on its fold edge, e.g. Unfold on left edge (fold line), then measure. Or measure the half and set the × cell to ×2. If the piece is already unfolded, ×2 shows a reminder to double-check.
- How do I continue later?
- Save with Save measurements (.json). Next time, open the same DXF first, then use Load measurements….
- Can I compare two versions of a pattern?
- Yes. With one file open, open the other with Open DXF and choose Add to compare. Each file gets its own coloured box (A · B · C), and Overlay stacks pieces with the same name.
Done reading? Open it and try.