
01Screen layout
Type on the left; the pattern is drawn immediately on the right.
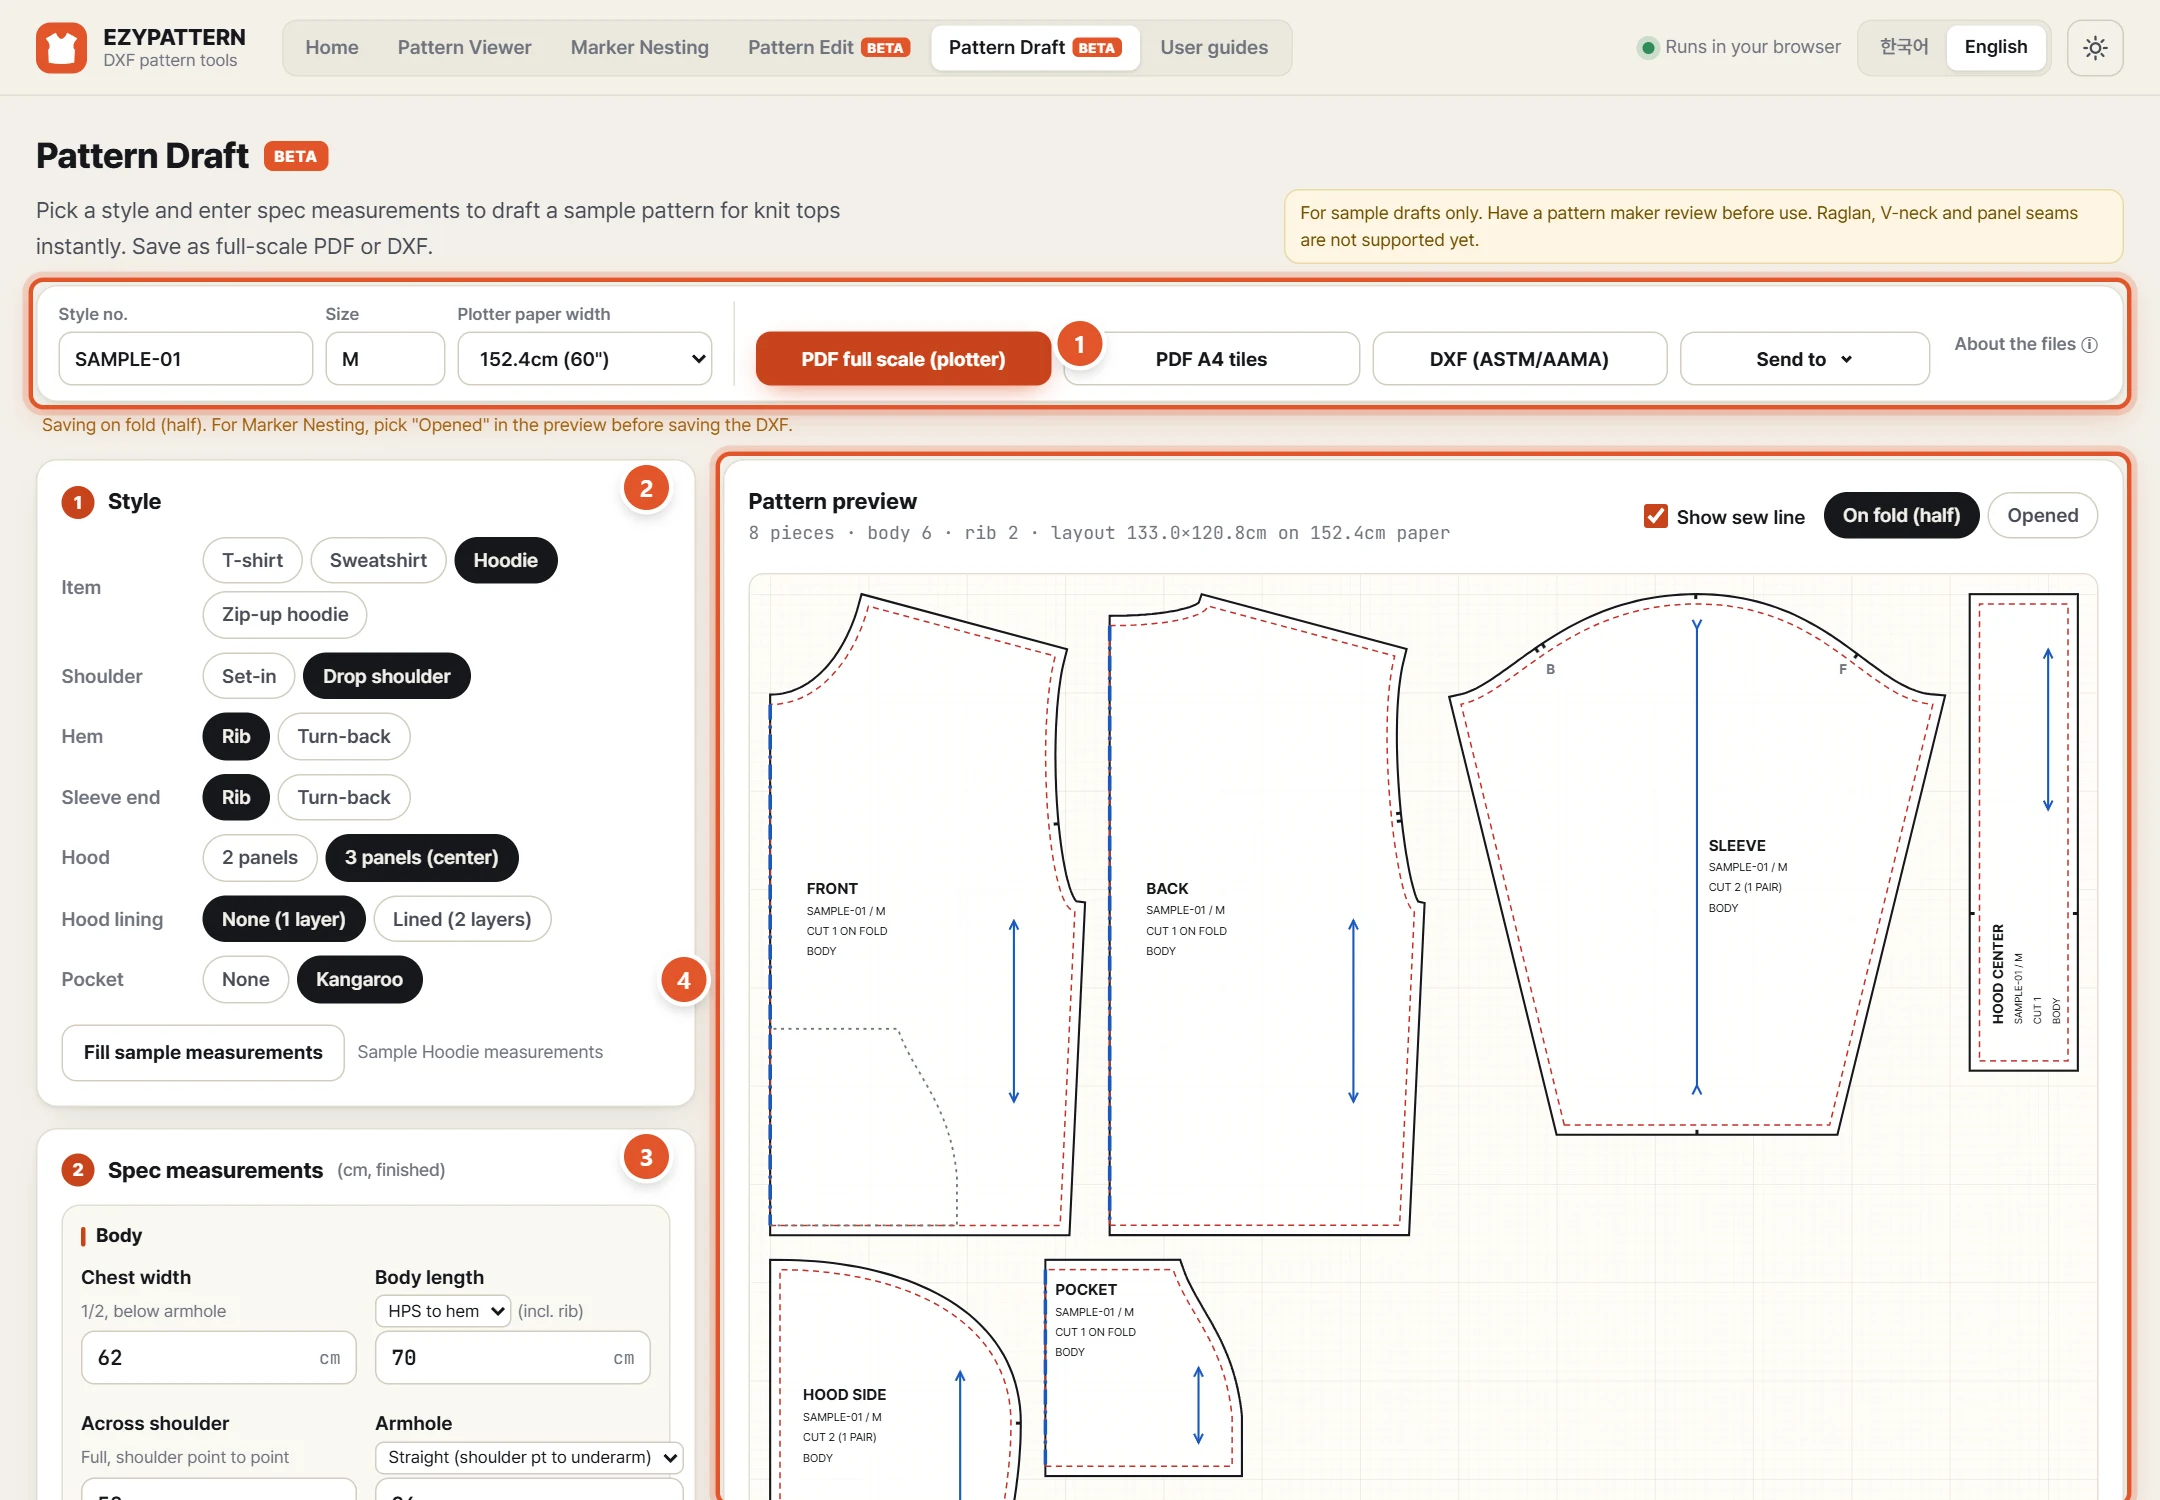
- Top row — Style no., Size, Plotter paper width, the save buttons PDF full scale (plotter) · PDF A4 tiles · DXF (ASTM/AAMA), Open in for other tools, and About the files.
- ① Style — choose the item, shoulder, hem, sleeve end, hood and pocket.
- ② Spec measurements — enter finished measurements (cm) by area. The pattern on the right updates as you type.
- ③ Seam allowance — set the basic allowance and the hem and cuff turn-ups.
- Pattern preview (top right) — the drawn pieces. Below it the Measurement check table shows whether the lines that are sewn together match.
TipIf you have a previous draft, you are first asked to Continue or Start new. Your measurements are kept only in this browser.
02Choose a style
First decide what kind of garment it is. The input boxes below change to match your choices.
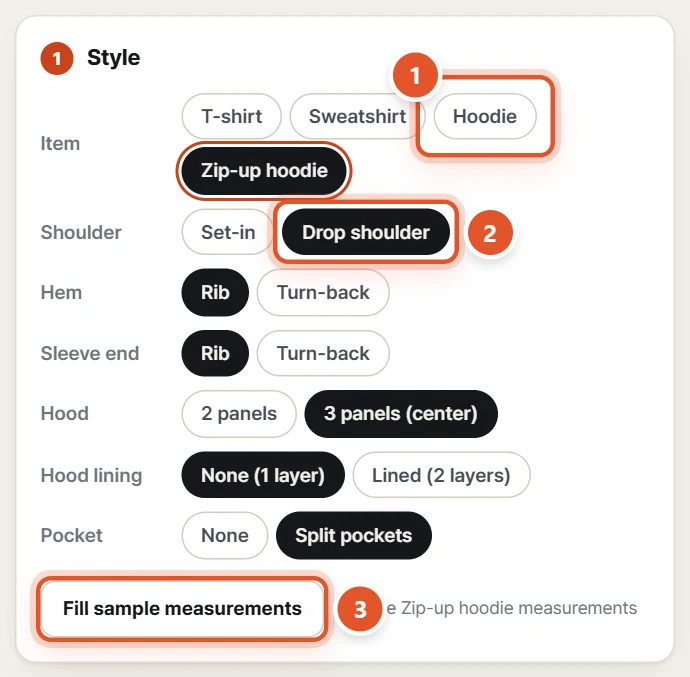
- Item — choose T-shirt, Sweatshirt, Hoodie or Zip-up hoodie.
- Shoulder — Set-in (normal sleeve at the shoulder point) or Drop shoulder.
- Hem · Sleeve end — each is Rib (a separate rib piece) or Turn-back.
- For hoodies, also choose Hood (2 panels or 3 panels (center)), Hood lining (None (1 layer) or Lined (2 layers)) and Pocket (None · Kangaroo).
- Fill sample measurements fills in example measurements for the chosen item. It is easiest to start from these and replace them with your own.
NoteChanging the item removes boxes the item does not use and adds new ones. After changing, Fill sample measurements puts in fresh starting values for that item.
03Enter the spec measurements
All values are finished measurements (cm), grouped by area (body · neck · sleeve · rib · hood · pocket).
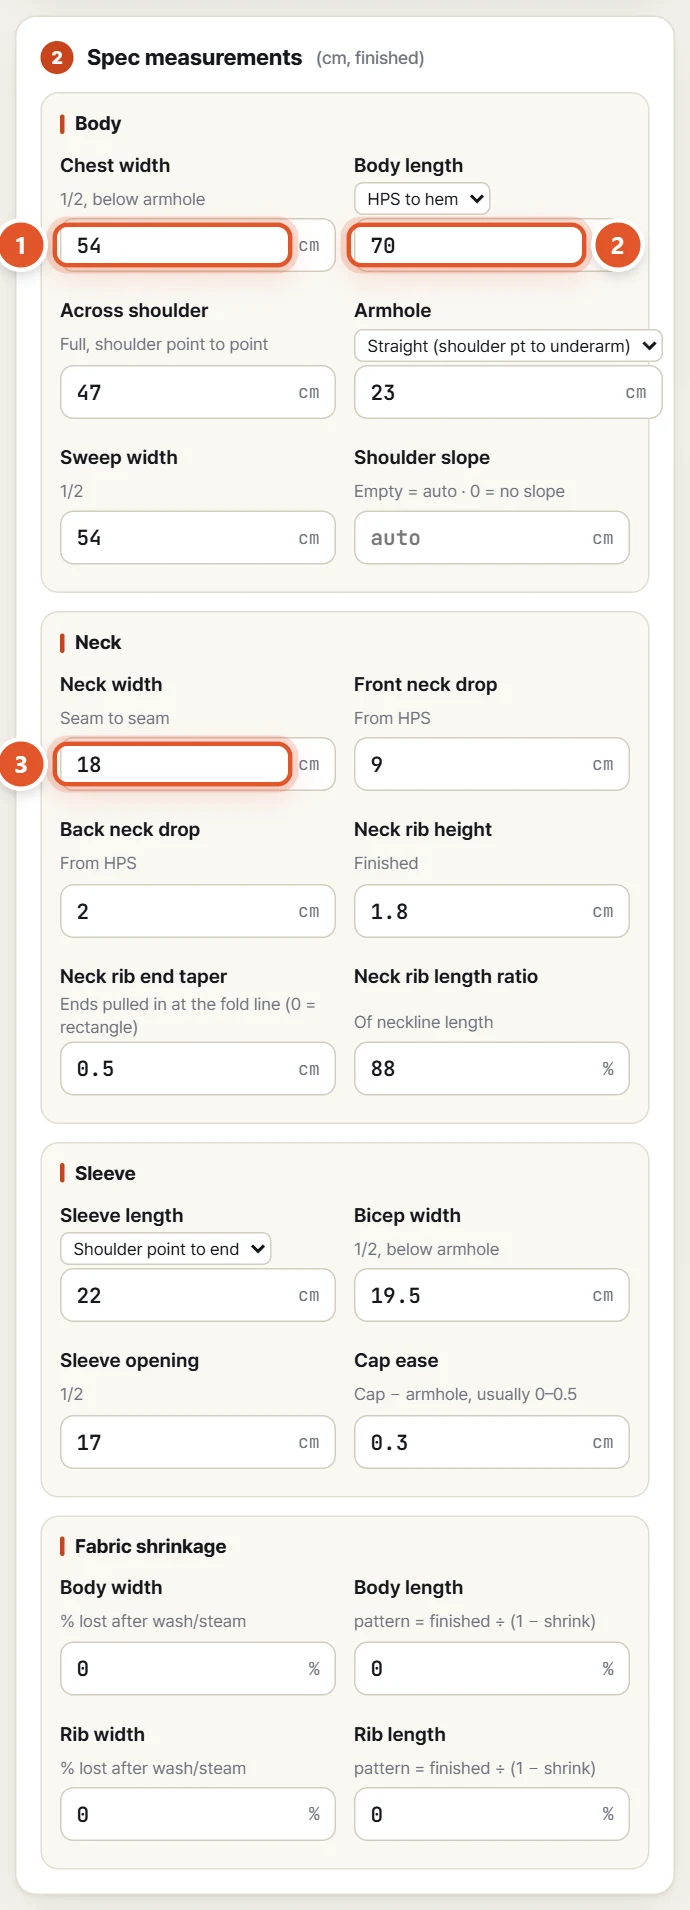
- Body — Chest width (1/2, below armhole) · Body length · Across shoulder · Armhole · Sweep width (1/2) · Shoulder slope.
- Pick the basis for Body length above the box: HPS to hem or CB to hem. For Armhole choose how you measured it: Straight (shoulder pt to underarm) or Curved (front + back).
- Leave Shoulder slope empty for automatic. 0 means no slope.
- Neck — Neck width (sew-line basis) · Front neck drop · Back neck drop (HPS basis) · Neck rib height · Neck rib end taper · Neck rib length ratio.
- Sleeve — Sleeve length (shoulder point to end, or CB to end) · Bicep width · Sleeve opening · Cap ease. With ribs chosen, the rib length ratio and height boxes for cuffs and hem appear too.
- Under Fabric shrinkage enter the % the fabric shrinks after washing or steaming, across and lengthwise for the body and the rib. 0 means no allowance.
TipWith shrinkage entered, the measurements are scaled up (finished ÷ (1 − shrinkage)) before drawing, not afterwards — so the sleeve cap and armhole stay matched.
04Seam allowance
The cut line is drawn this far outside the sew line. The default is 1 cm.
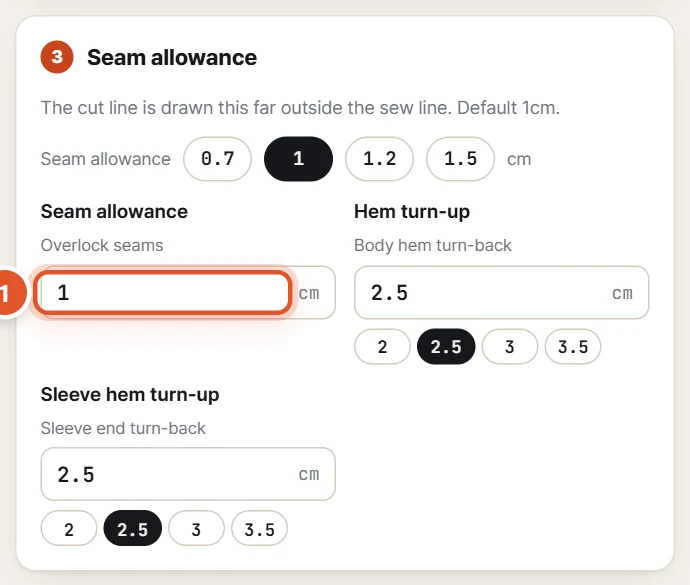
- Click the 0.7 · 1 · 1.2 · 1.5 chips for the Seam allowance, or type the cm directly (for an overlocked seam).
- If you chose Turn-back for the hem or sleeve end, also set Hem turn-up and Sleeve hem turn-up (2 · 2.5 · 3 · 3.5 cm).
- With a hood or pocket, allowance boxes for the hood front edge and the pocket opening also appear.
05Pattern preview
The pattern is redrawn as soon as you change a value. The top line shows the piece count, layout size and paper width.
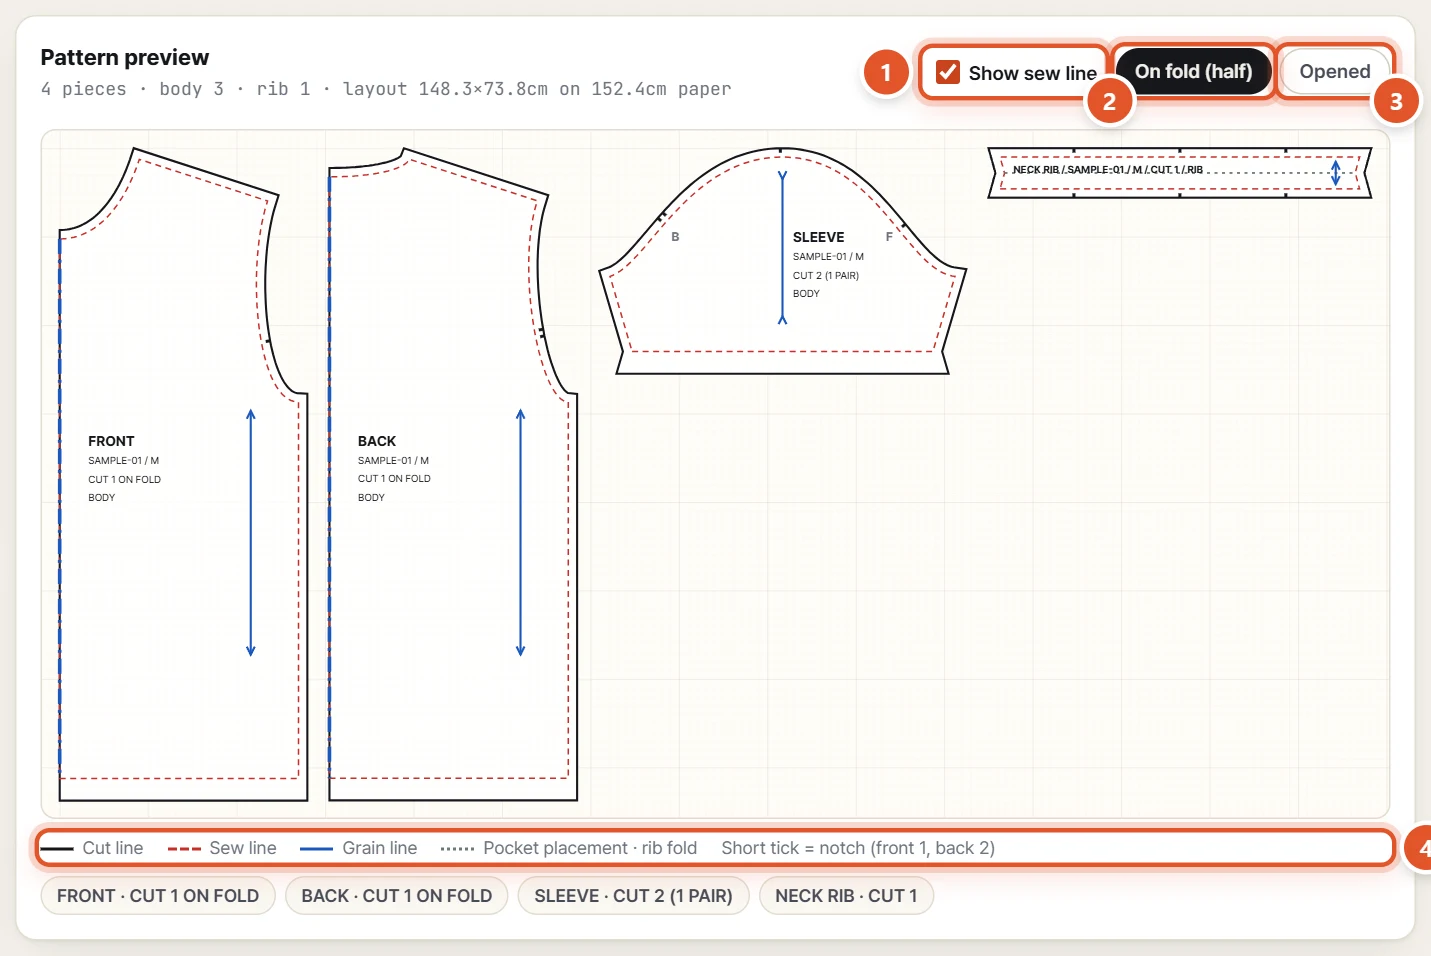
- Show sew line on shows the red dashed sew line; off shows only the cut line.
- On fold (half) draws symmetrical pieces such as the front and back as one half, to cut on the fold. Opened draws both halves.
- Legend — black line = cut line, red dashed = sew line, blue arrow = grain direction, dotted = pocket placement · rib fold, short tick = notch (front 1, back 2).
- Each piece is labelled with the style number, size, cut quantity (e.g. cut 1 on fold, 1 pair) and fabric. The chips below list every piece at a glance.
TipA rib piece longer than the paper is turned 90° automatically.
06Measurement check
The tool measures the drawn pattern along the sew lines and tells you whether the lines that are sewn together match.
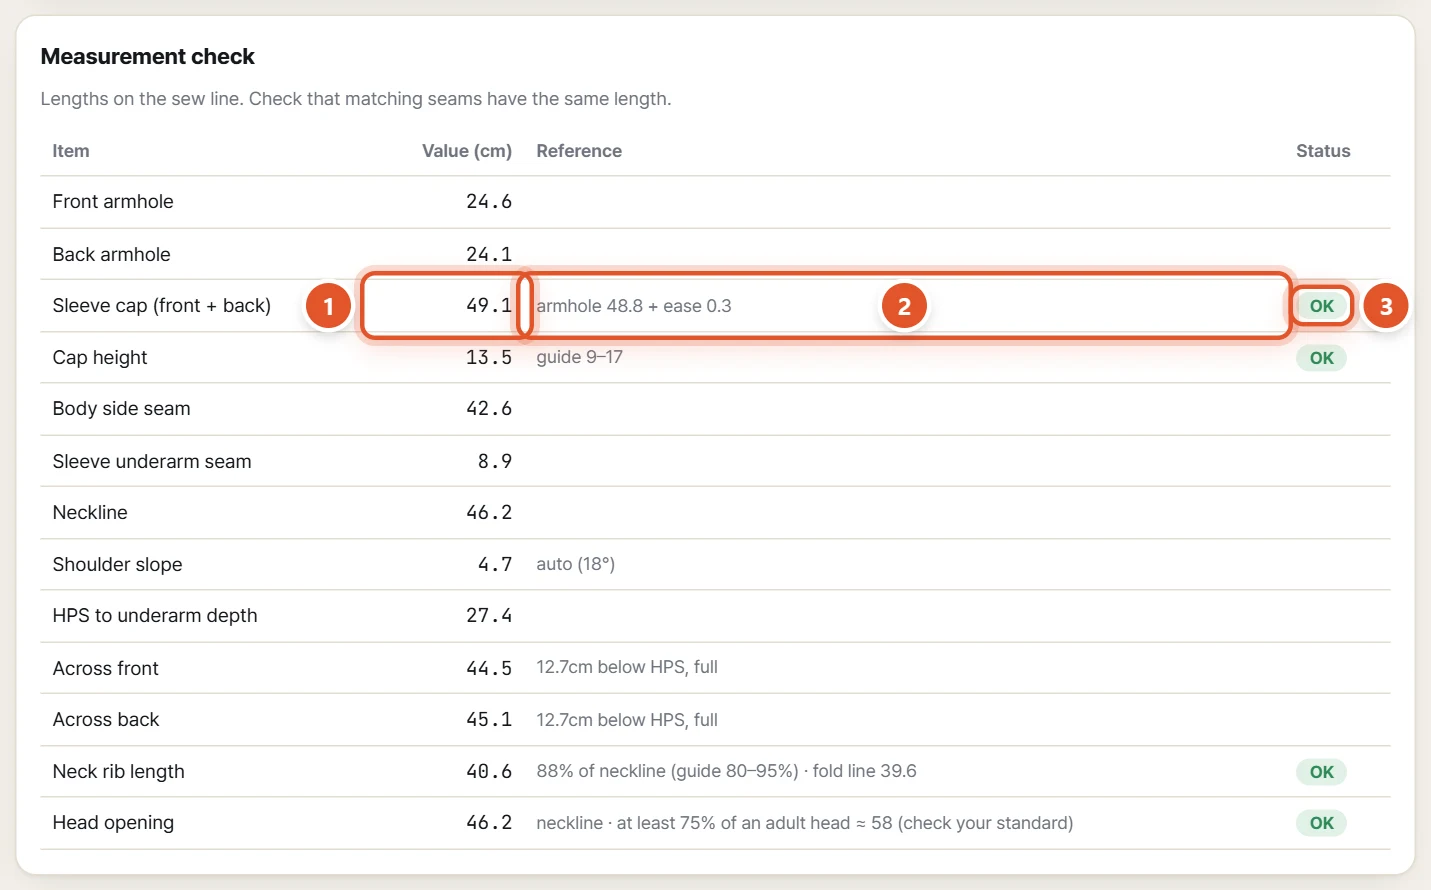
- Value (cm) is the length measured on the drawn pattern. Reference shows what it was compared with, or a rule-of-thumb range (e.g. armhole + ease, reference 9–17).
- Status shows OK when the matching lengths agree. If not, Check appears — review the measurement for that item.
- Checked items include sleeve cap ↔ armhole + ease, cap height, hood neck ↔ body neck, the neck rib ratio, and whether the neckline is wide enough for a head.
NoteReference ranges are typical values. They vary with the garment and fabric, so something that is not "OK" can stay if you meant it.
07Save as PDF or DXF
In the top row, enter the style number and size, then pick a format.

- Style no. and Size accept letters and numbers only (A–Z, 0–9, - _ /). They are written into the PDF and DXF.
- PDF full scale (plotter) — choose the Plotter paper width (91.4 · 111.8 · 152.4 · 183 cm) and download a PDF laid out at real size for that width.
- PDF A4 tiles — a PDF split into A4 pages for a desktop printer. Tape the sheets together.
- DXF (ASTM/AAMA) — downloads a ZIP containing ① an AAMA file (for this site's Viewer, Nesting and Pattern Edit, and for CAD), ② a plain lines-only DXF (for programs that cannot open AAMA) and ③ a measurement note (spec.txt). Units are mm.
NotePrint PDFs at actual size (100%), plotter or A4, and check the 10 cm square with a ruler. DXF import settings differ between CAD programs, so measure once the first time.
08Open in other tools
Open the drafted pattern straight in another tool without saving.
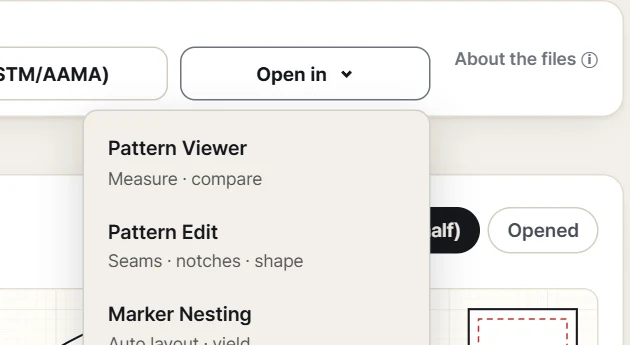
- Click Open in ▾ in the top row.
- Pick Pattern Viewer (measure · compare), Pattern Edit (seam · notch · reshape) or Marker Nesting (auto-nest · yardage) and it opens in the same tab.
- The file is held only inside your browser for a moment (10 minutes) and is never sent to a server.
NoteThe draft is saved on the fold (half). For Marker Nesting, first choose Opened in the preview, then save or send.
09FAQ
- Can I use the drawn pattern for production as is?
- No. It is a sample draft — have a pattern maker review it first. Raglan, V-neck and panel seams are not supported yet.
- Are my measurements sent to a server?
- No. All calculation and drawing happen in this browser, and your measurements are stored only in this browser.
- The printout is not the right size.
- If "Fit" or "Fit to page" is on in the print dialog the pattern shrinks. Set the scale to 100% (actual size) and measure the 10 cm square with a ruler.
- How do I enter shrinkage?
- Enter the % the fabric shrinks after washing or steaming, across and lengthwise, for the body and the rib. For example 5% across — type 5. 0 means no allowance. Values above 30% are not accepted.
- How do I put it into Marker Nesting?
- Choose Opened in the preview and use Open in → Marker Nesting, or save with DXF (ASTM/AAMA) and open that file in Nesting.
Done reading? Open it and try.