
01Screen layout
Once a DXF is open you are on the Patterns screen. Set up fabrics and quantities here, then press Run marker to build the marker.
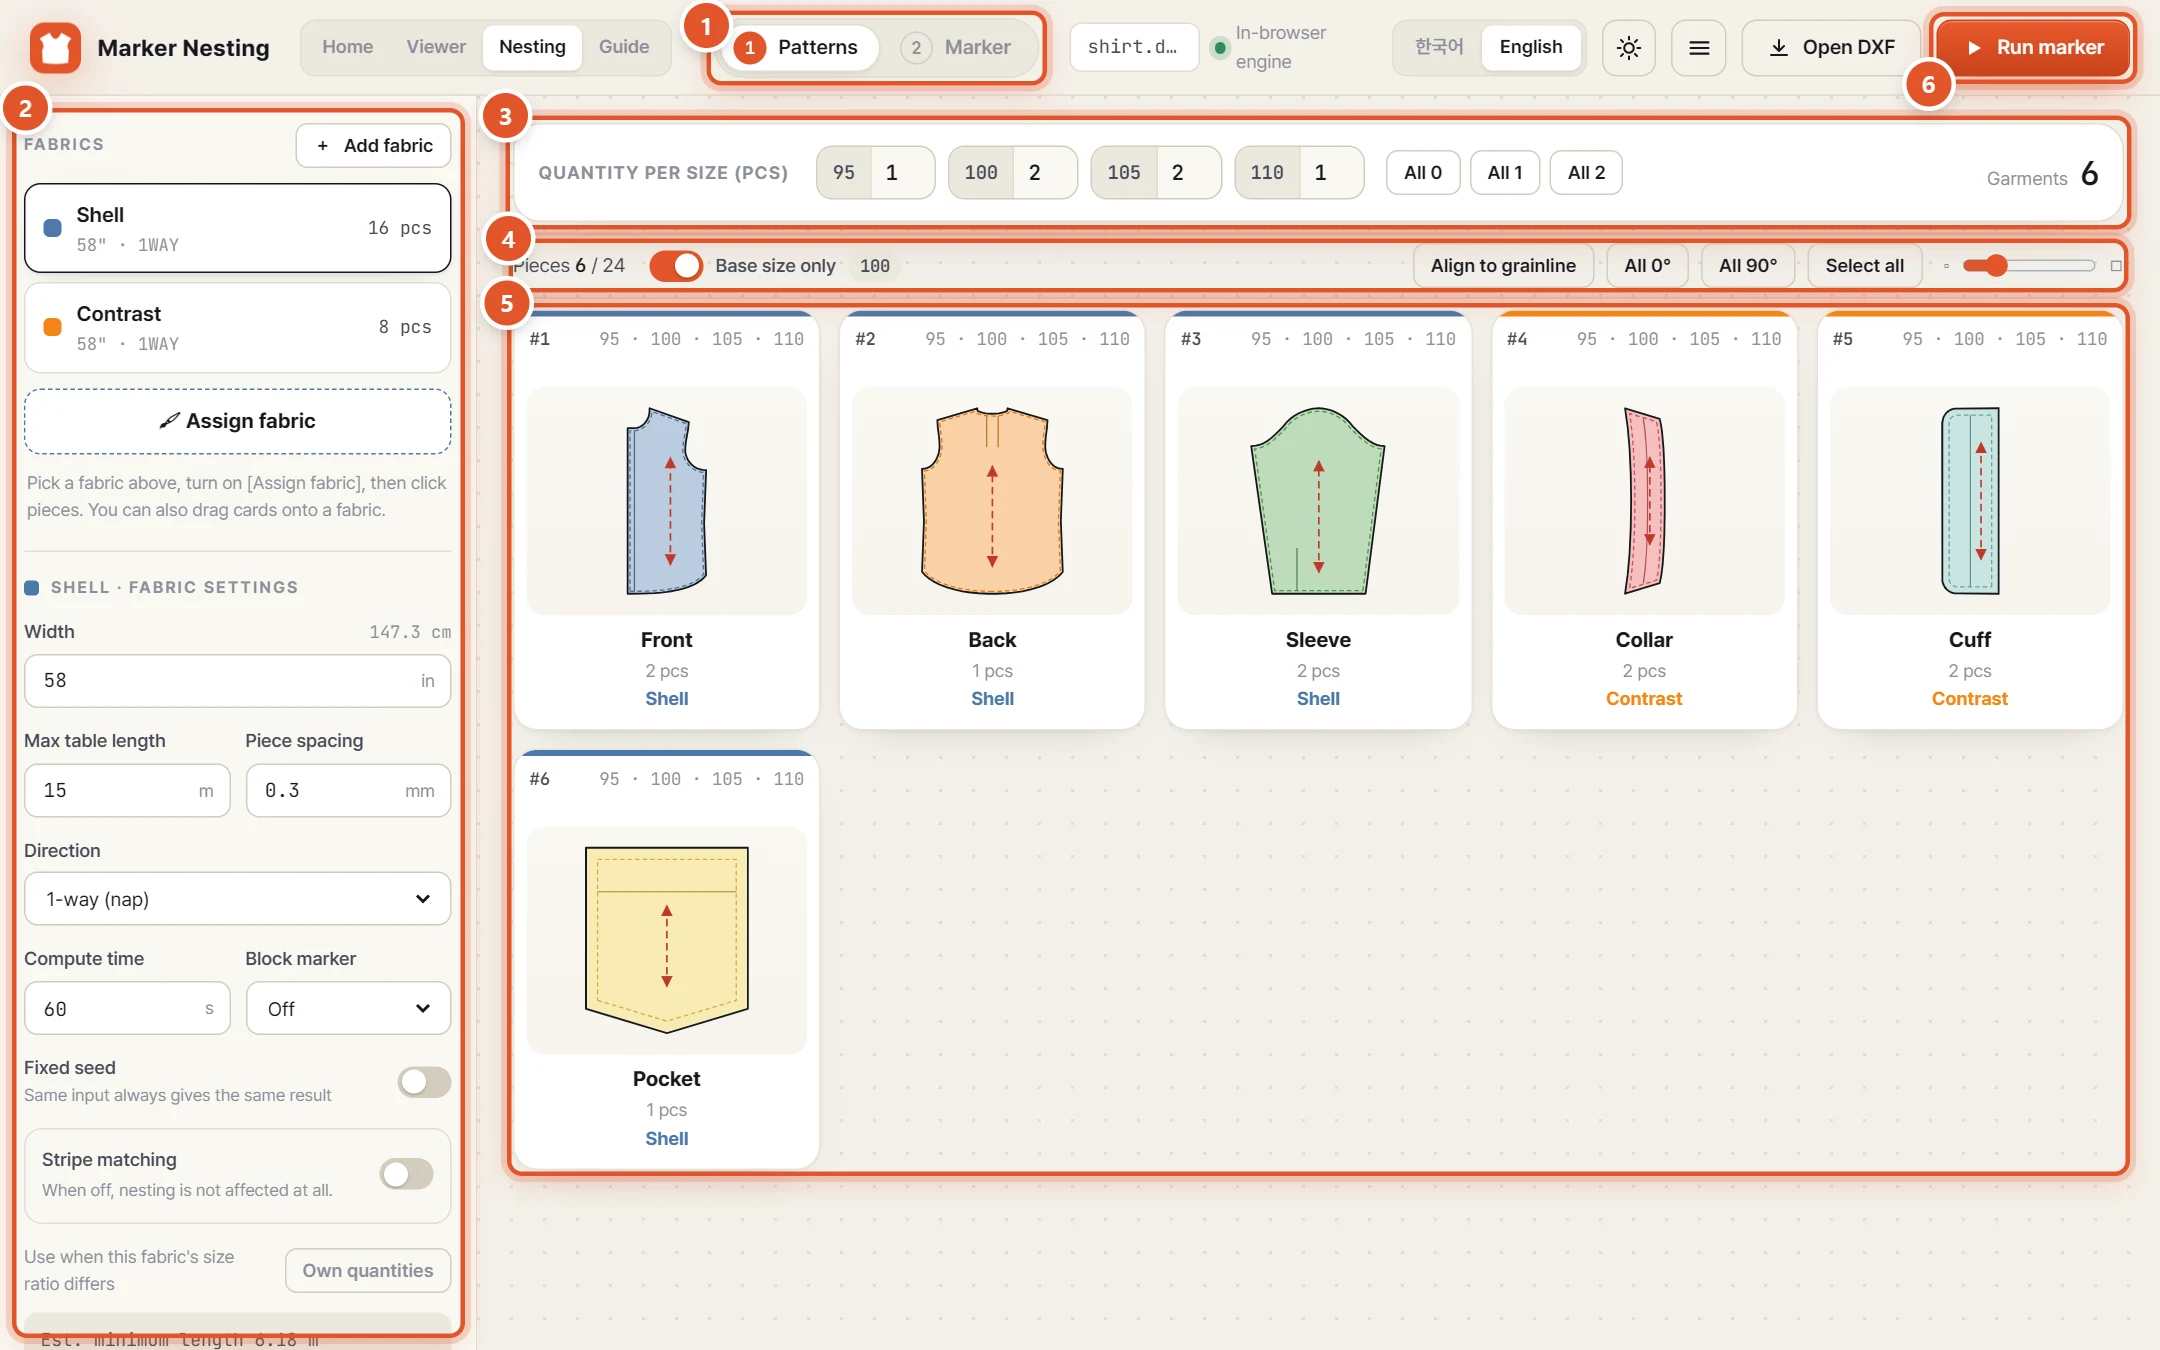
- The two work steps: get ready on Patterns, see the result on Marker.
- The fabric list and fabric settings. Each fabric has its own width, direction and compute time.
- Quantity per size — how many garments to cut in each size.
- The toolbar: piece count, the base-size view, and the align and select buttons.
- Piece cards. One card per part, with the pieces per garment and the assigned fabric underneath.
- Run marker — press it when everything is ready.
TipUse Home, Pattern Viewer and Marker Nesting at the top to switch between tools.
02Open a DXF file
Open your file from the start screen. It is read only inside this browser.
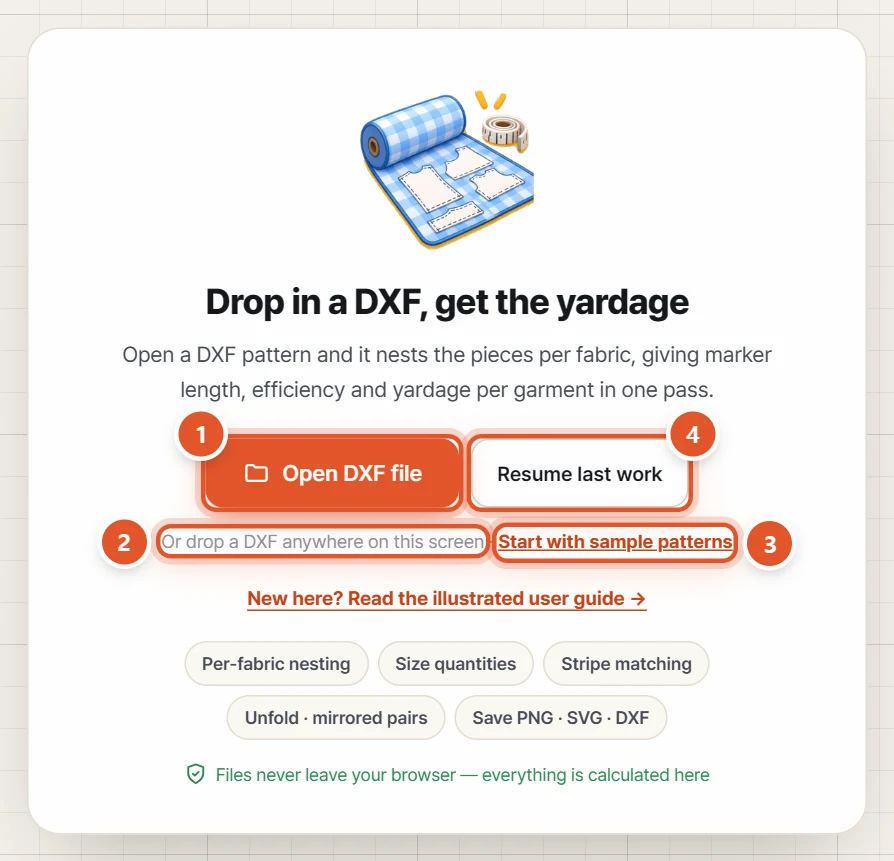
- Click Open DXF file and choose your DXF.
- Or drag the DXF file and drop it anywhere on this screen.
- To practise first, click Start with sample patterns.
- If you have worked here before, Resume last work appears. It reopens your last job just as you left it.
TipWhen the file has been read, a message such as “Loaded 24 pieces · 4 sizes” appears and you move to Patterns. While working, you can open another file with Open DXF at the top right.
NoteOpening a new DXF replaces the current job. If you want to keep it, use Save project first.
03Add fabrics and assign pieces
Tell the tool which fabric each piece is cut from. Right after you open a file, every piece is No fabric.
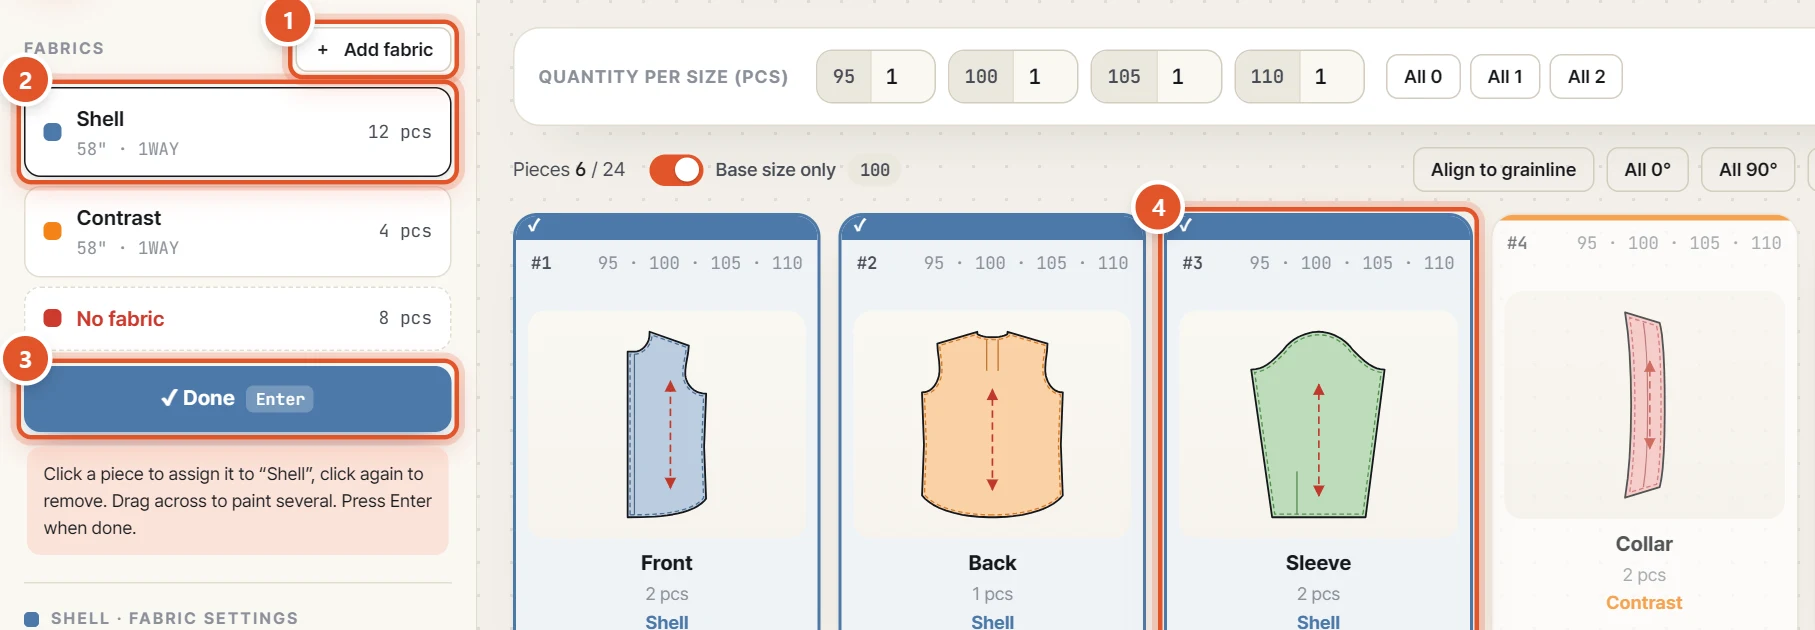
- If you use more than the shell fabric (contrast, lining…), click Add fabric. Double-click a fabric in the list to rename it.
- Click the fabric you want to assign in the list.
- Turn on Assign fabric. While it is on, the button reads Done.
- Click a piece card to assign it — a ✓ appears on the card. Click again to remove it, or hold the button and drag across cards to paint several. When you are finished, press Done or Enter.
TipWhen assign mode is off, you can also drag a card onto a fabric on the left. Right-click a fabric for more: Duplicate, Own quantities…, Run this fabric only and so on.
NoteIf any piece is still on No fabric, Run marker does not start — you are brought back here with a message.
04Fabric settings (width, direction, time)
Click a fabric in the list and its settings appear below. Each fabric is set separately.
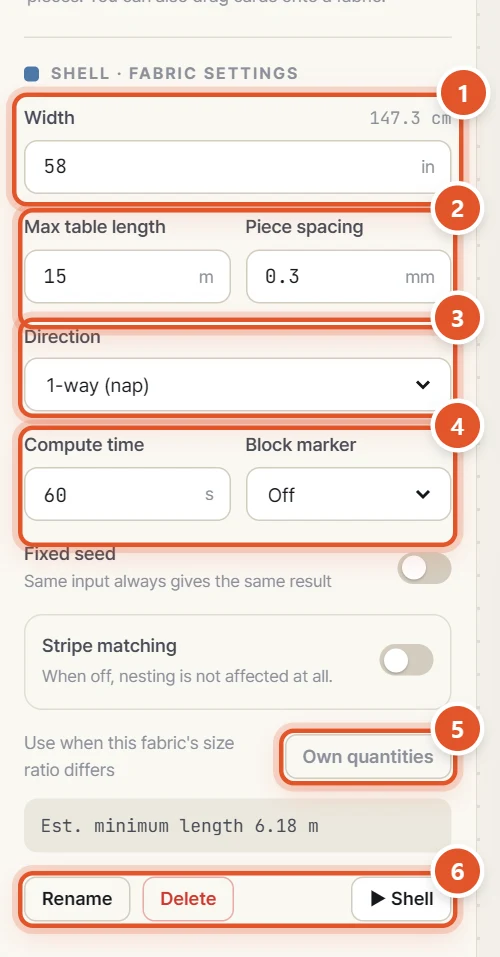
- Enter the Width in inches. The value in cm is shown at the top right.
- Max table length is the longest lay your cutting table takes (m). Piece spacing is the gap left between pieces (mm).
- Pick the Direction. 1-way (nap) keeps every piece facing the same way, 2-way also allows 180° turns, and Free 90° rotation turns pieces in 90° steps.
- Compute time is how long (in seconds) the engine works on one fabric; more time can find a tighter layout. Set Block marker to 2 or 3 zones to keep each garment's pieces together and avoid shading.
- If this fabric needs a different size ratio, click Own quantities and enter it separately.
- The buttons at the bottom Rename or Delete the fabric. The button with the fabric's name, such as ▶ Shell, nests this fabric only.
TipEst. minimum length is a rough length worked out from the piece area; a warning is added if it may exceed Max table length. Turn on Fixed seed to get the same result from the same input.
05Enter quantities per size
The sizes in your DXF are listed automatically. Enter how many garments to cut in each size.

- Type the number of garments next to each size. 0 leaves that size out.
- All 0, All 1 and All 2 set every size at once.
- Garments shows the total. Yardage per garment is divided by this number.
- With Base size only on, you see one card per part and every change applies to all sizes. Turn it off to see a separate card for each size.
TipThe count on each card, such as 2 pcs, is pieces per garment, taken from the DXF. The marker gets pieces per garment × garments.
06Work with piece cards and View large
Select cards to rotate them or add mirrored pairs. Open View large to look at a piece closely.
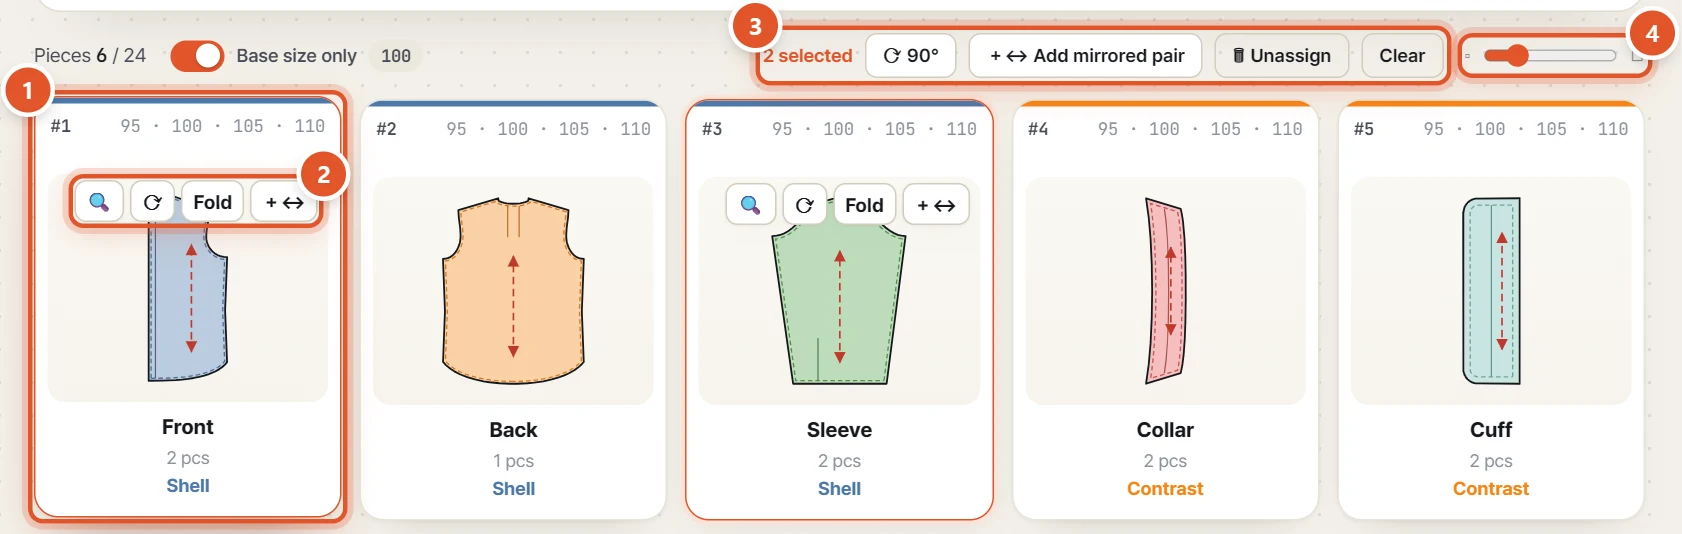
- Click a card to select it. Ctrl+click adds more cards; Shift+click selects every card in between.
- Hover over a card to show four small buttons: magnifier (View large), ⟳ (rotate 90°), Fold (unfold on the fold line) and +↔ (add mirrored pair).
- With cards selected, the toolbar shows ⟳ 90°, +↔ Add mirrored pair, Unassign and Clear.
- Drag the slider at the far right to change the card size.
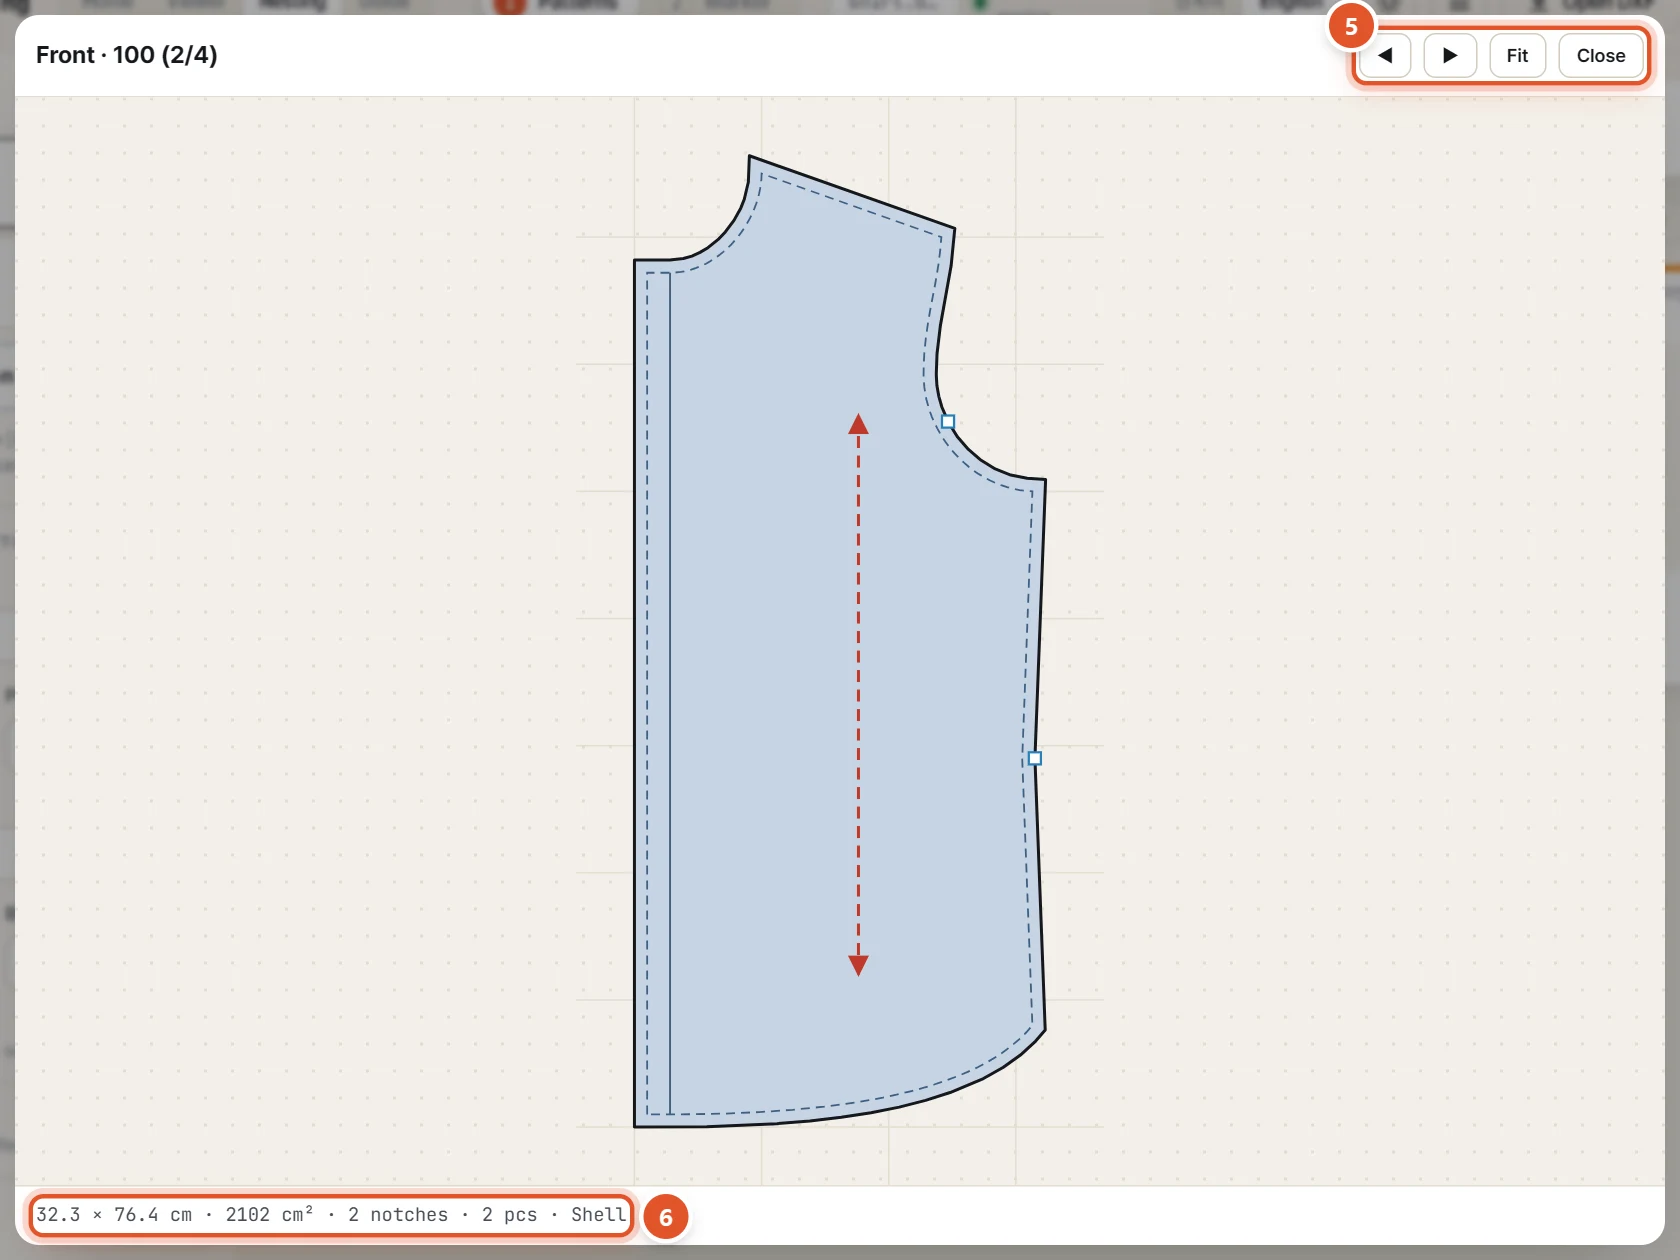
- Open a piece with the magnifier button (or right-click → View large). Use ◀ ▶ to step through the other sizes of the same part, Fit to reset the zoom, and Close or Esc to close.
- The bottom line shows the size (cm), area, number of notches, pieces per garment and fabric. Use the wheel to zoom and drag to pan. Blue □ are notches, the red arrow is the grainline, and the faint grid is 10 cm.
TipWith nothing selected, Align to grainline turns every piece to its grainline, and All 0° / All 90° set the angle of all pieces at once.
07Right-click menu (unfold, mirror, exclude)
Right-click a card to see every command for that piece. Select several cards first to apply a command to all of them.
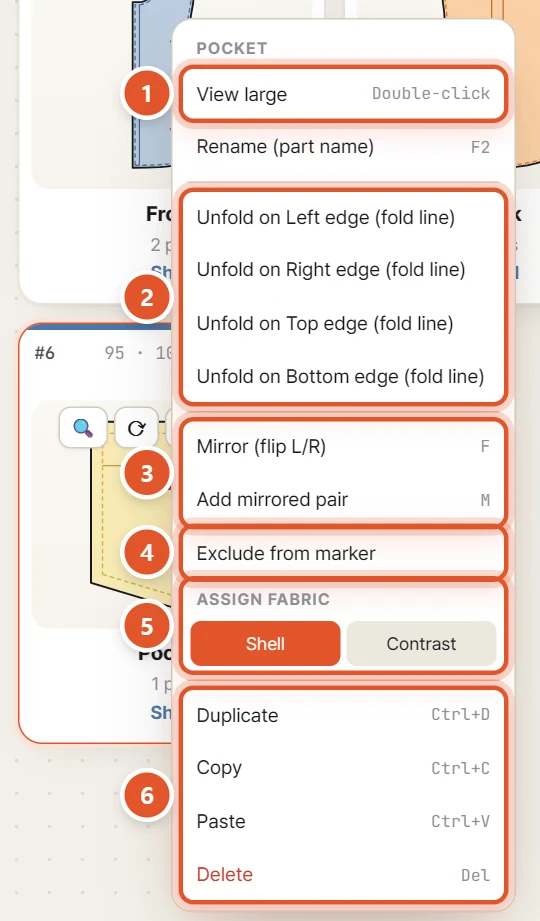
- View large opens the piece. Change the part name with Rename (part name) just below it.
- For a half pattern drawn on the fold, choose the fold edge, e.g. Unfold on Left edge (fold line). Only a straight edge can be used. The card then shows a badge such as Unfold L; Remove unfold puts it back.
- Mirror (flip L/R) flips the piece. Add mirrored pair makes the flipped partner as a new card (its name ends with ↔). The partner goes into the marker with the same piece count, and its quantity and rotation are managed separately.
- Exclude from marker keeps the piece but leaves it out of the marker. The card fades and shows Excluded. To bring it back, use Include in marker in the same place.
- The fabric buttons under ASSIGN FABRIC change the piece's fabric directly.
- Duplicate, Copy, Paste and Delete also work with the shortcuts shown on the right.
TipMade a mistake? Press Ctrl+Z to undo.
08Stripe matching
For striped fabric: each piece is placed so that a chosen point sits on a stripe. While it is off, nesting is not affected at all.
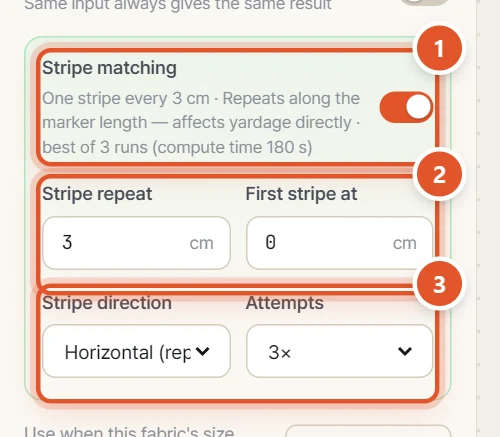
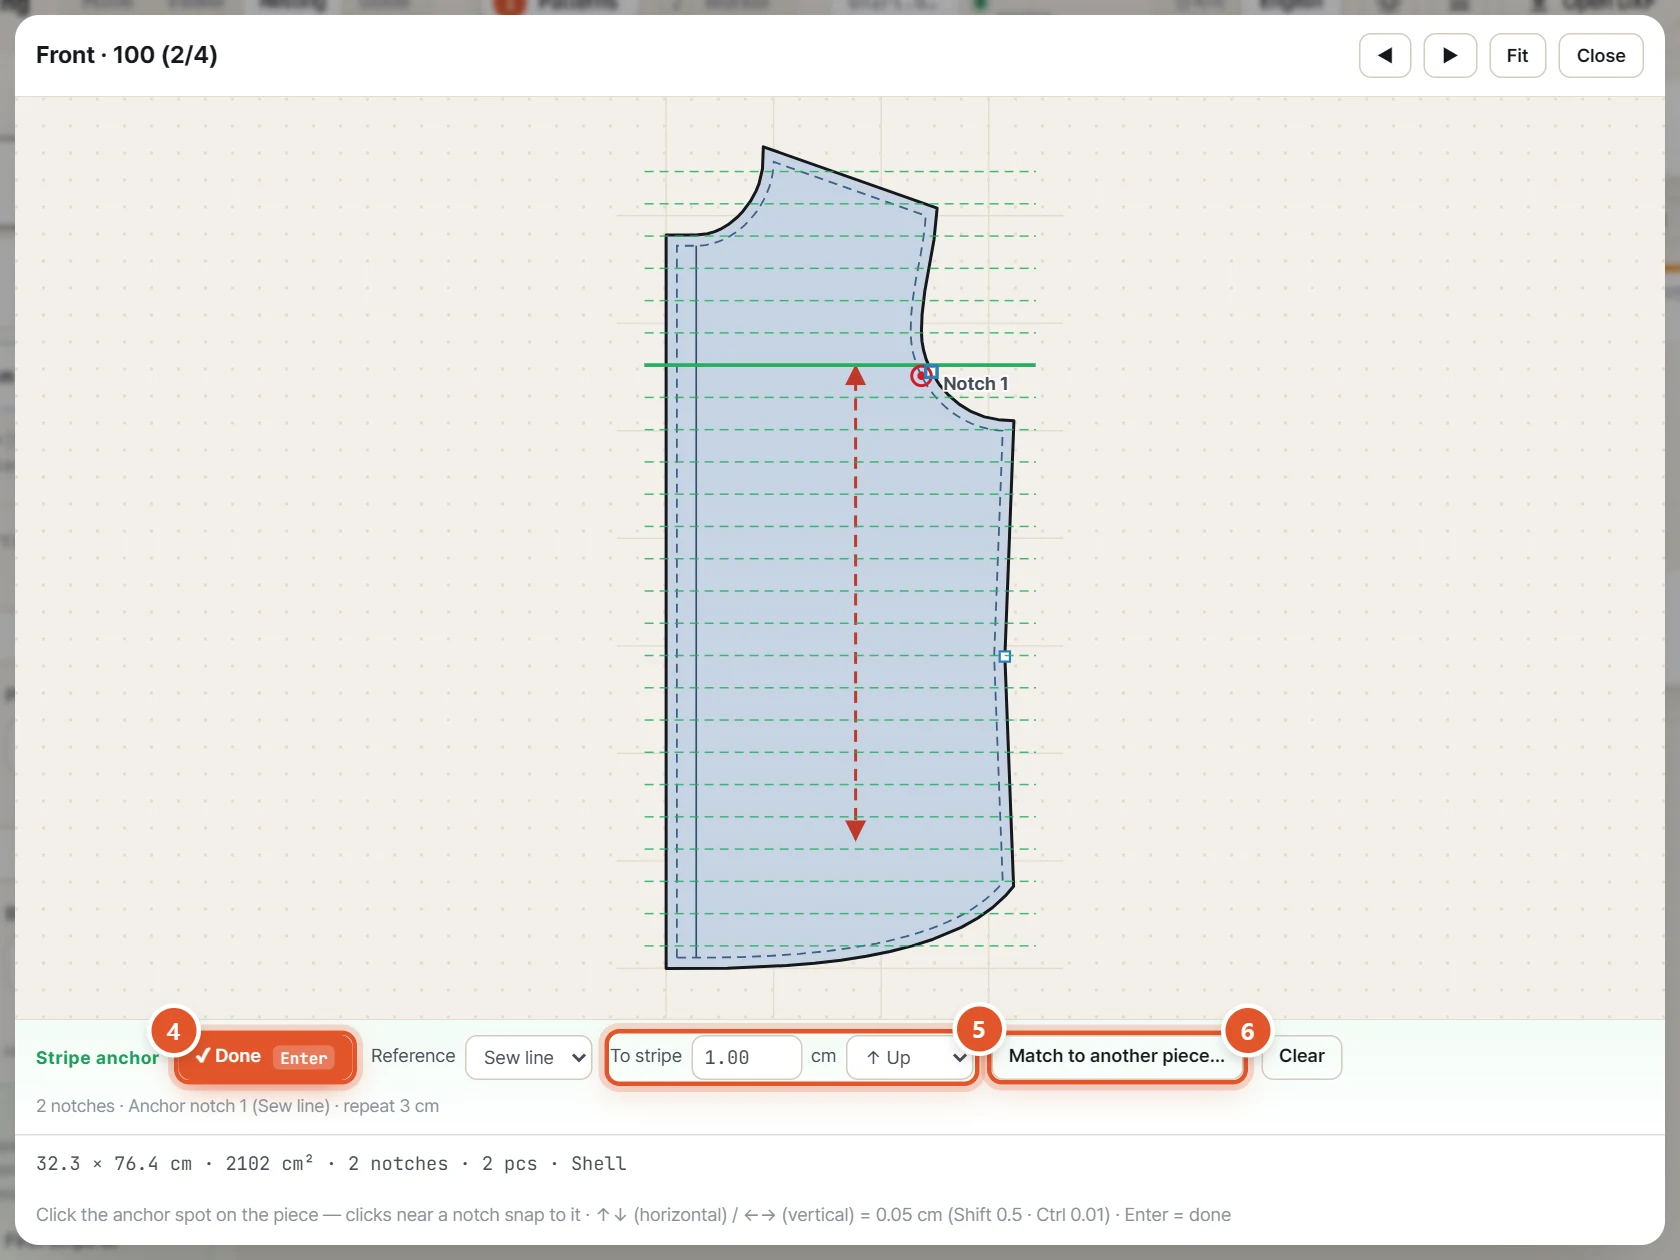
- In the fabric settings, turn on Stripe matching.
- In Stripe repeat, enter how many cm it takes for the stripe to repeat (measure the fabric). First stripe at moves where the first stripe lies.
- Choose the Stripe direction — horizontal (repeats along the length) or vertical (repeats across the width). Attempts sets how many runs to try; the shortest marker is kept.
- Open the source piece (usually the front) in View large, click Pick anchor, then click the reference spot on the piece. Clicks near a notch snap to it; the anchor is shown as a red circle. Finish with Done or Enter.
- In To stripe, enter the distance from the anchor to the stripe (cm) and its direction (↑ Up / ↓ Down; for vertical stripes → Right / ← Left). The solid green line is the stripe to match; the dashed green lines are the other stripes.
- For pieces that must match the front (sleeve, pocket…), open them in View large, click Match to another piece…, click the spot that meets when sewn on each side, then OK. The stripe position is worked out automatically for every size.
TipMarks in the matching window: □ notch, △ sew-line corner, × corner of an inner line (such as a pocket placement line), ⊕ any spot on the piece. While picking an anchor, the arrow keys change To stripe by 0.05 cm (Shift 0.5 · Ctrl 0.01).
NoteStripe matching multiplies the compute time by the number of Attempts (e.g. 60 s × 3 = 180 s). Pieces with an anchor are placed only at 0° or 180°, even with free rotation.
09Run the marker
When everything is set, the engine nests one fabric after another. Each fabric takes about its Compute time.


- Click Run marker at the top right (or press F5 or Ctrl+Enter).
- The bar shows which fabric is being nested and the time elapsed. The line underneath shows progress.
- Each fabric shows its status: Waiting, Running or Done.
- Engine log shows what the engine is doing, as text.
- Stop ends the run. Fabrics that have already finished keep their results.
- When every fabric is done, the Marker screen opens by itself.
TipTo re-run a single fabric, use the button with its name at the bottom of the fabric settings (e.g. ▶ Shell), or right-click the fabric → Run this fabric only.
NoteIf Run marker is greyed out, the engine is still loading. Wait until the green dot and In-browser engine appear at the top right.
10Read the results (yardage, efficiency, layout)
The Marker screen shows a summary at the top, a table per fabric in the middle and the layout below.
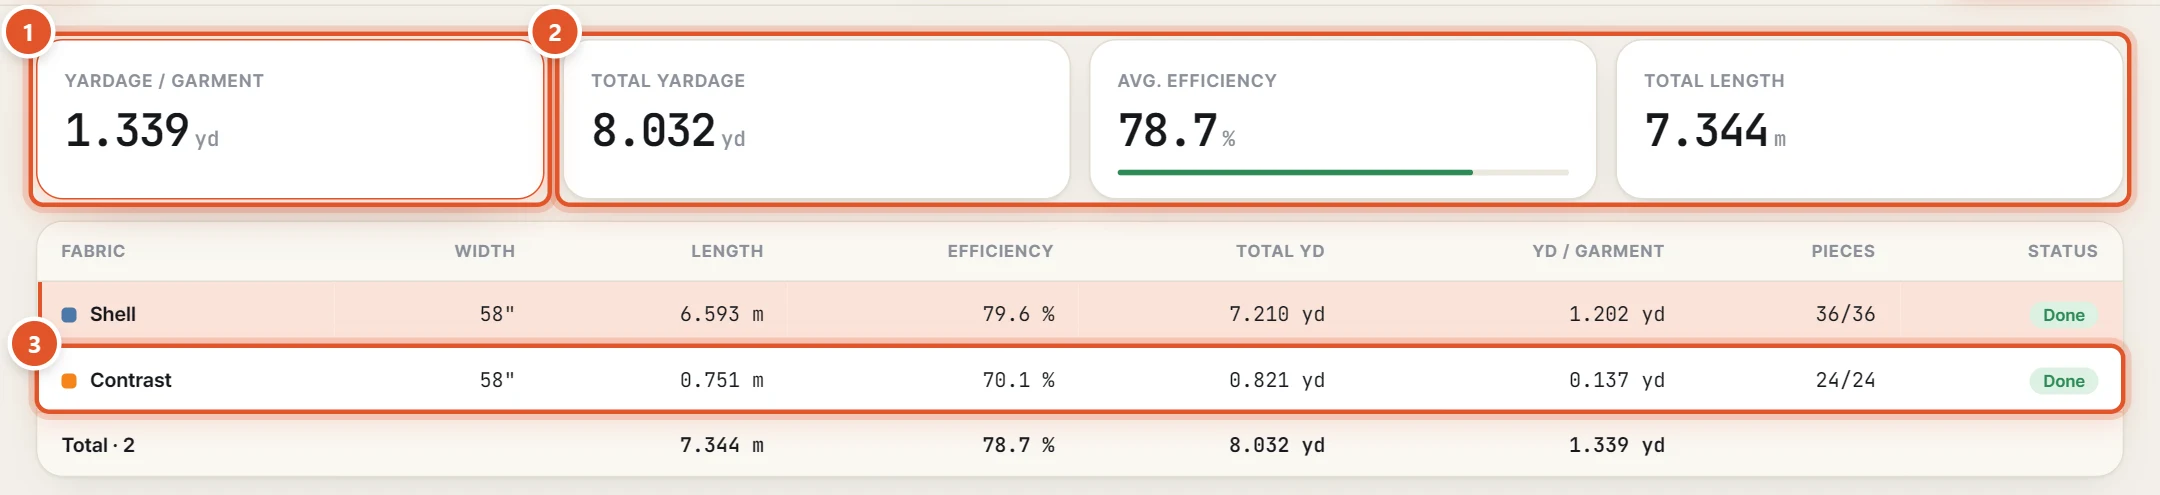
- YARDAGE / GARMENT is the fabric length (yd) one garment needs — the total over all fabrics.
- TOTAL YARDAGE (yd), AVG. EFFICIENCY (%) and TOTAL LENGTH (m) cover all fabrics together.
- The table has one row per fabric: width, length, efficiency, total yd, yd per garment, pieces (placed/needed) and status. Click a row to show that fabric's layout below.
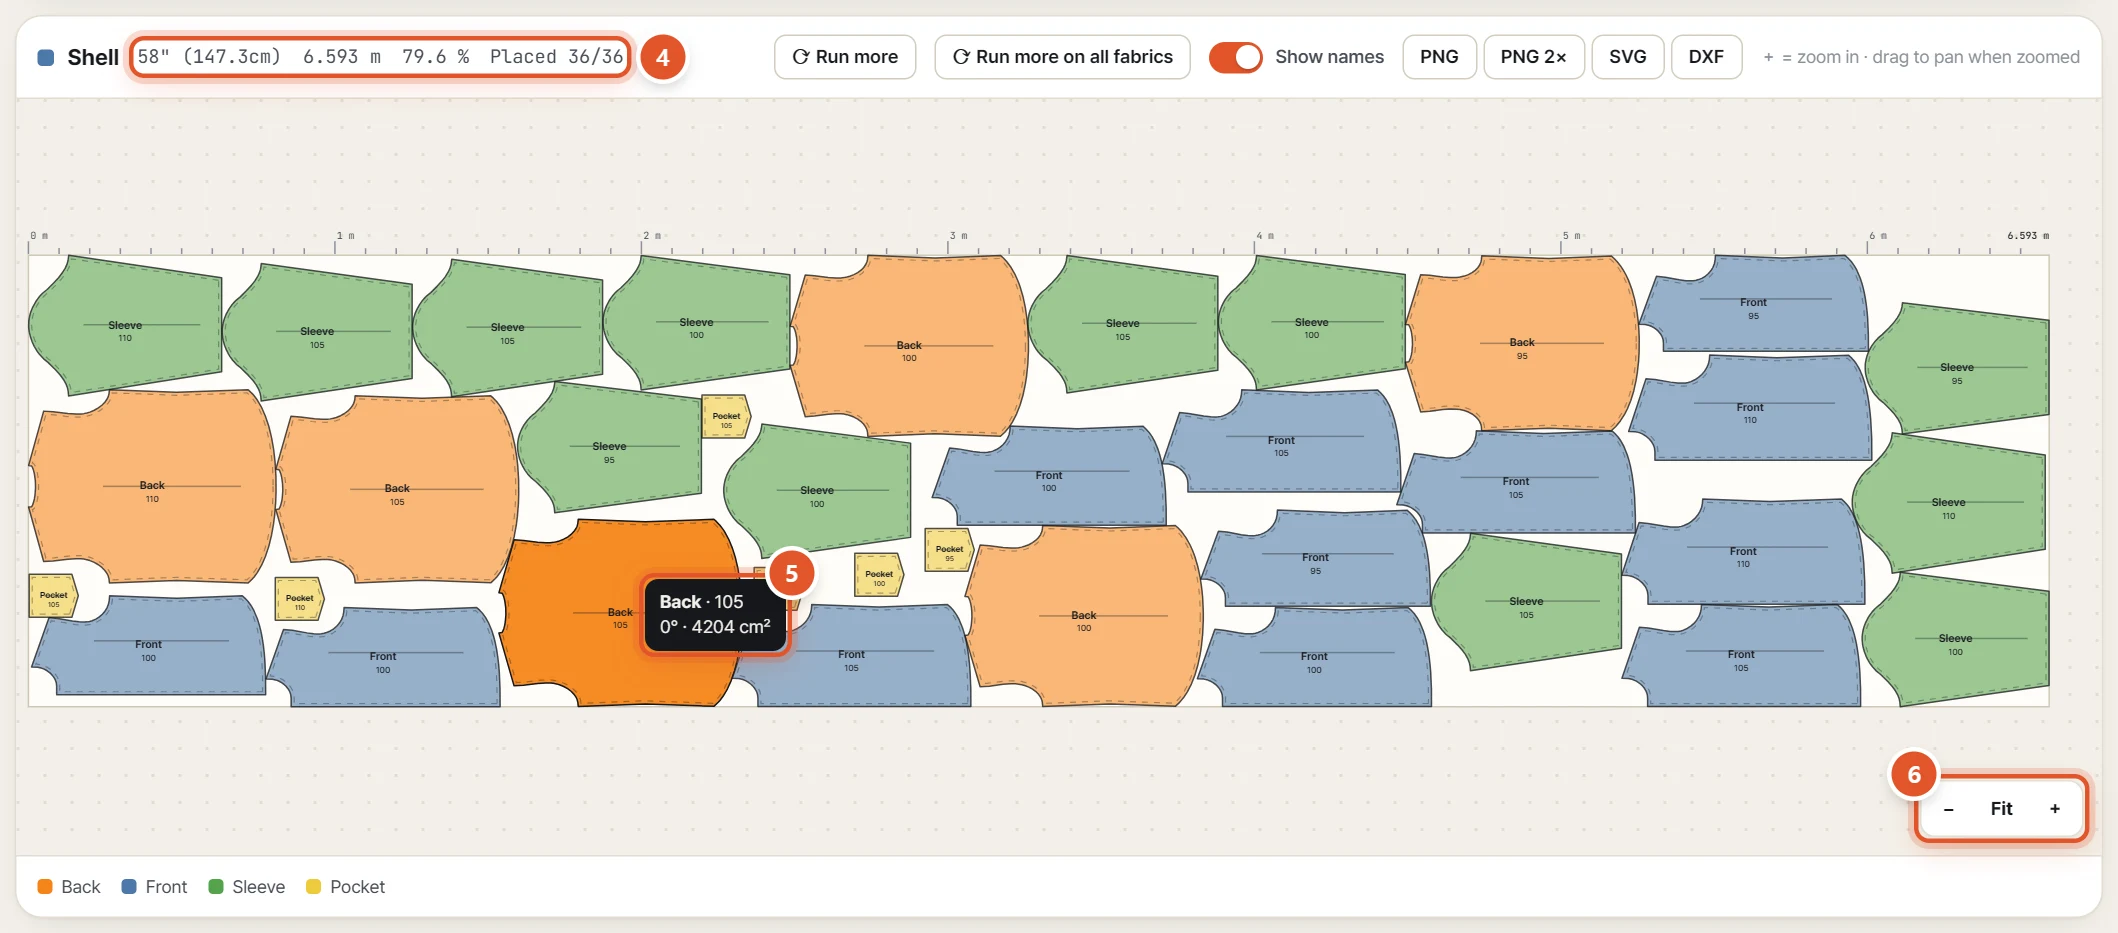
- The line above the layout shows the width, marker length, efficiency and the Placed count.
- Hover over a piece to see its part, size, angle and area.
- The marker stays fixed — dragging or the scroll wheel won’t move it. To look closer, click + at the bottom right; once zoomed in you can drag to pan. Click Fit to go back.
- To shorten the marker further, click ⟳ Run more. It continues from the current marker, and keeps the previous result if it can’t get shorter. You can also right-click a fabric name and choose Run more on this fabric (continue) or Run more on all fabrics.
TipThe ruler at the top is in metres, with the marker length in bold at the right end. Turn off Show names to hide the labels on the pieces. If the marker reaches or passes the Max table length, the limit shows as a red dashed line and a warning appears above.
NoteThe yardage does not include end loss or cutting allowance. Add them separately when you quote.
11Save your work (images, DXF, project)
Layouts are saved one fabric at a time — the fabric you are looking at. The whole job is saved as a project file (.json).

- PNG — an image with a title line (style, fabric, width, marker length, efficiency, yardage per garment, garments, date).
- PNG 2× — the same image at double resolution.
- SVG — a vector image that stays sharp at any size.
- DXF — the fabric outline (layer FABRIC) and the placed pieces (layer MARKER) as a DXF for your CAD.
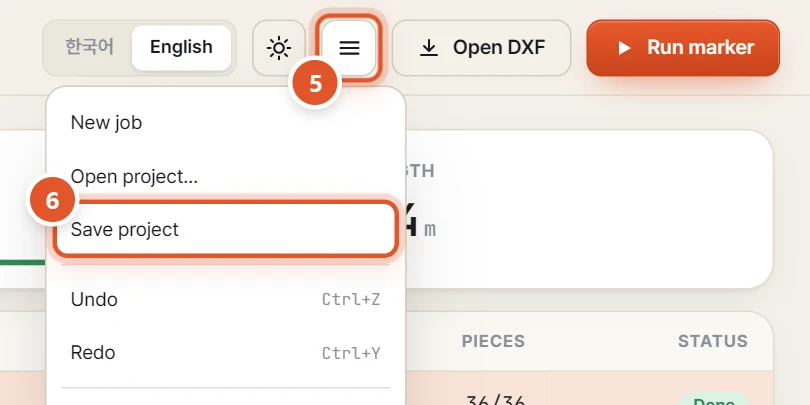
- Click the ☰ menu button at the top right.
- Save project downloads a project file (.json). Later, open it with Open project… or drop it onto the screen to carry on where you left off.
TipYour work is also saved in this browser automatically, so Resume last work appears next time. To carry on on another PC, take the Save project file with you. The same menu also has Undo, Redo and New job.
NoteNew job closes the current job and also clears the copy saved in the browser. Use Save project first if you need it.
12Engine status, language, theme and units
The top right shows the engine status and lets you change the language and the screen theme.

- A green dot with In-browser engine means it is ready. Loading engine… means wait a moment; No engine means check your internet connection and reload the page.
- Switch the screen language with 한국어 / English. Standard part and fabric names are shown in English as well (e.g. 앞판 → Front).
- The sun button switches between the light and dark screens.
TipUnits: fabric width in inches (cm shown beside it), max table length and marker length in m, piece spacing in mm, stripe repeat in cm, yardage in yd. 1 yd = 91.44 cm.
13Keyboard shortcuts
| Ctrl + Z | Undo |
| Ctrl + Y | Redo (Ctrl+Shift+Z also works) |
| F5 | Run marker |
| Ctrl + Enter | Run marker |
| Enter | Finish assigning fabric (Done) · finish picking an anchor |
| Esc | Close a menu · clear the selection · close View large |
| Ctrl + A | Select all visible pieces (Patterns screen) |
| Ctrl + C | Copy the selected pieces |
| Ctrl + V | Paste |
| Ctrl + D | Duplicate the selected pieces |
| Delete | Delete the selected pieces |
| R | Rotate the selected pieces 90° |
| Shift + R | Rotate −90° |
| F | Mirror (flip L/R) |
| M | Add mirrored pair |
| F2 | Rename (part name) |
| ← | Previous size in View large |
| → | Next size in View large |
14FAQ
- Is my file uploaded to a server?
- No. Reading the DXF and nesting both happen inside this browser. The DXF reader and the fonts are downloaded when the page first opens, so you do need an internet connection.
- Which DXF files can I open?
- AAMA/ASTM DXF files exported from pattern CAD work best. When each piece is its own block, the part name, size and quantity are read too. In a DXF without blocks, each closed shape becomes one piece, named by number. The cut line is looked for on layer 1 first; otherwise it is detected automatically.
- It says “No cut line found”.
- No closed piece outline was found in the file. The message lists the layers in the file — check in your CAD that the cut line is saved as a closed line, then export again.
- The pieces come out far too small or too large.
- This is usually a DXF unit problem. The tool reads the unit written in the DXF header (inch, mm, cm…) and assumes mm when none is given. Compare the cm size on the bottom line of View large with the real pattern; if it is wrong, set the unit in your CAD and export again.
- Part names show as numbers or the Korean text is garbled.
- The Korean text was damaged when the file was exported from CAD. If it cannot be recovered, the pieces are numbered and a notice appears. Check that the export encoding is Korean (CP949). You can fix names with right-click → Rename (part name).
- Does the yardage include any allowance?
- No. Yardage per garment = marker length (yd) ÷ garments. End loss and cutting allowance are not included, so add them when you quote.
- The result changes slightly every time I run it.
- The engine tries many layouts within the set Compute time. Turn on Fixed seed to get the same result from the same input, and give it more compute time to find a tighter layout.
- It says “N pieces not placed”.
- Some pieces could not be placed on the fabric. Check that no piece is wider than the fabric and that the Direction setting is not too strict, then run again with more Compute time.
- It warns that the marker length exceeds the limit.
- The marker is longer than the Max table length in the fabric settings. Cut fewer garments per lay, or raise Max table length if your table is longer.
- My work is gone.
- Work is saved automatically in this browser. Open the page again on the same PC and browser and Resume last work appears on the start screen. It is not there after clearing browser data or on another PC, so keep important jobs as a Save project file.
Done reading? Open it and try.